IEEE Front-End Development Committee Meetings
This repository contains materials and notes from our IEEE Front-End Development committee meetings.
Meeting Schedule
Meeting 1
- Introduction to Web Development
- IDE Setup
- Basic HTML Structure
Meeting 1 Part 2
- HTML Tags Documentation
- Text Formatting
- Lists and Tables
- Forms and Media
- Semantic Elements
Meeting 2
- Semantic HTML
- HTML Forms & Inputs
- Form Validation
- Accessibility Basics
Meeting 3
- Web Accessibility
- ARIA Labels
- Semantic HTML Best Practices
- Accessibility Testing Tools
Meeting 4
- Version control
- Git & Github
- GitPages
Meeting 5 ,Meeting6,...
Resources
IEEE FrontEnd committee: First Lecture
Introduction to Web Development
What is Web Development?
Web development is the process of building websites and web applications that people use daily, like Google, YouTube, and Amazon.
The Two Main Parts of Web Development
- Front-End (Client-Side) → What users see and interact with (UI/UX).
- Back-End (Server-Side) → Manages data, databases, and server operations.
Analogy:
- Think of a website as a car:
- Front-End = The car's dashboard, design, and controls (what you see and interact with).
- Back-End = The engine and mechanics (how it works behind the scenes).
What is Front-End Development?
Front-end developers create the user interface (UI) and experience (UX) using three main technologies:
| Technology | Purpose |
|---|---|
| HTML (HyperText Markup Language) | Structure of a webpage |
| CSS (Cascading Style Sheets) | Styling and layout |
| JavaScript | Adds interactivity and logic |
Example
- When you open Google.com:
- HTML creates the search bar and buttons.
- CSS makes it look nice.
- JavaScript makes the search function work.
Overview of IDEs & Environment Setup
What is an IDE?
An IDE (Integrated Development Environment) is a tool where developers write and edit code. Popular choices:
- VS Code (Recommended)
- WebStorm
- Sublime Text
Setting Up VS Code for Web Development
- Download and install VS Code from https://code.visualstudio.com/.
- Install extensions:
- Live Server → Auto-refresh your webpage.
- Prettier → Auto-format your code.
- Create a new project folder and open it in VS Code.
- Create a new file:
index.html.
Basic HTML Structure
HTML (HyperText Markup Language) provides the foundation of any webpage. It consists of elements enclosed in tags (<>).
Basic Structure of an HTML Document
<!DOCTYPE html>
<html lang="en">
  <head>
    <meta charset="UTF-8" />
    <meta name="viewport" content="width=device-width, initial-scale=1.0" />
    <title>My First Webpage</title>
  </head>
  <body>
    <h1>Welcome to Web Development</h1>
    <p>This is a basic webpage structure.</p>
    <a href="#" target="_blank">Visit IEEE</a>
    <button onclick="alert('Hello!')">Click Me</button>
  </body>
</html>
Explanation
<html>→ The entire webpage.<head>→ Metadata (title, character set, etc.).<body>→ The visible content.<h1>→ Heading.<p>→ Paragraph.<a>→ Hyperlink.<button>→ Interactive button.
Hands-On Challenge
Task: Create your First WebPage
Objective
Create a webpage that demonstrates your understanding of essential HTML elements and basic webpage structure.
Requirements
Create an HTML file named index.html that includes:
- A proper HTML document structure:
<!DOCTYPE><html><head><body>
- A title for your webpage
- At least two different levels of headings
- A paragraph about your favorite hobby
- An unordered list of your top 3 favorite foods
- An ordered list of your daily routine (at least 3 items)
- An image (you can use any appropriate image)
- A link to your favorite website
Bonus
- Search for Semantic HTML tags and use them
Wrap-Up
Key Takeaways
- Web development = Front-end + Back-end.
- Front-end uses HTML, CSS, and JavaScript.
- HTML is the foundation of every webpage.
Next Steps
- In the next session, we will explore Semantic HTML and Form
IEEE FrontEnd committee: First Lecture Part 2 : HTML Tags Documentation
Table of Contents
Text Formatting
| Tag | Inline/Block | Description | Important Attributes |
|---|---|---|---|
<p> | Block | Defines a paragraph | - |
<strong> | Inline | Makes text bold | - |
<em> | Inline | Emphasizes text (italic) | - |
<mark> | Inline | Highlights text | - |
<sup> | Inline | Superscript text | - |
<sub> | Inline | Subscript text | - |
<blockquote> | Block | Represents a block of quoted text | - |
<pre> | Block | Preformatted text with preserved spaces and line breaks | - |
<abbr> | Inline | Represents an abbreviation | title (tooltip text) |
<cite> | Inline | Represents the title of a work | - |
<code> | Inline | Represents inline code snippets | - |
Lists
| Tag | Inline/Block | Description | Important Attributes |
|---|---|---|---|
<ul> | Block | Unordered list | - |
<ol> | Block | Ordered list | type (1, a, A, i, I) |
<li> | Block | List item inside <ul> or <ol> | - |
Tables
| Tag | Inline/Block | Description | Important Attributes |
|---|---|---|---|
<table> | Block | Defines a table | border (for border display) |
<tr> | Block | Defines a row in a table | - |
<th> | Block | Defines a header cell in a table | colspan, rowspan |
<td> | Block | Defines a standard cell in a table | colspan, rowspan |
Forms
| Tag | Inline/Block | Description | Important Attributes |
|---|---|---|---|
<form> | Block | Defines an HTML form | action, method |
<input> | Inline | Defines an input field | type, name, placeholder |
<textarea> | Block | Defines a multi-line text input | rows, cols |
<button> | Inline | Defines a clickable button | type |
Media
| Tag | Inline/Block | Description | Important Attributes |
|---|---|---|---|
<img> | Inline | Embeds an image | src, alt, width, height |
<audio> | Block | Embeds audio content | controls, src |
<video> | Block | Embeds video content | controls, width, height |
<canvas> | Block | Used for drawing graphics via JavaScript | width, height |
Semantic Elements
| Tag | Inline/Block | Description | Important Attributes |
|---|---|---|---|
<article> | Block | Represents independent content | - |
<aside> | Block | Defines content aside from the main content | - |
<figure> | Block | Groups media elements | - |
<figcaption> | Inline | Provides a caption for <figure> | - |
Interactive Elements
| Tag | Inline/Block | Description | Important Attributes |
|---|---|---|---|
<details> | Block | Creates an expandable section | - |
<summary> | Inline | Provides a summary for <details> | - |
<progress> | Inline | Represents a progress bar | value, max |
<meter> | Inline | Represents a scalar measurement within a range | value, min, max |
Not all the tags will be Shown in today meetings like the rest of Semantic Elements and input types
IEEE FrontEnd committee: Second Lecture
1 Wrap-up of the Last Meeting
In our previous meeting, we covered:
- HTML Basics and Structure
- Commonly Used Tags and Their Purpose
- Introduction to Forms and Input Types
- Semantic HTML and Its Importance
2 Challenges and Questions Raised
- Understanding the difference between block and inline elements.
- When to use
divvs semantic elements likesectionorarticle. - Best practices for structuring forms and handling user input.
- Using VS Code shortcuts effectively to improve coding speed.
3 Pending Discussions and Improvements
- Deep dive into HTML Forms and Input Types.
- Advanced Semantic Elements and their usage.
- More real-world examples of well-structured web pages.
- Setting up a small project to practice front-end development concepts.
Today, we will build on that foundation and dive deeper into essential front-end concepts.
Semantic HTML & Forms
What is Semantic HTML?
SEO topic
Semantic HTML refers to using meaningful HTML elements that describe their purpose, making web pages more accessible and easier to understand.
Why Use Semantic HTML?
- Improves SEO (Search Engine Optimization).
- Enhances accessibility for screen readers.
- Provides better code readability and structure.
Common Semantic Elements
| Element | Purpose |
|---|---|
<header> | Defines the header section of a webpage |
<nav> | Contains navigation links |
<section> | Represents a standalone section |
<article> | Represents independent content (e.g., blog post) |
<aside> | Used for sidebars, additional info |
<footer> | Defines the footer section |
Example of Semantic HTML page
<header>
<h1>Welcome to My Website</h1>
</header>
<nav>
<ul>
<li><a href="#about">About</a></li>
<li><a href="#services">Services</a></li>
<li><a href="#contact">Contact</a></li>
</ul>
</nav>
<section id="about">
<h2>About Us</h2>
<p>We build amazing web applications.</p>
</section>
<footer>
<p>© 2025 My Website</p>
</footer>
HTML Forms & Inputs
What is an HTML Form?
An HTML form collects user input and sends it to a server for processing.
Basic Form Structure
<form action="/submit" method="POST">
  <label for="name">Name:</label>
  <input type="text" id="name" name="name" required />

  <label for="email">Email:</label>
  <input type="email" id="email" name="email" required />

  <label for="message">Message:</label>
  <textarea id="message" name="message" rows="4"></textarea>

  <button type="submit">Submit</button>
</form>
Explanation of Form Elements
| Element | Purpose |
|---|---|
<form> | Container for input elements |
<input> | Accepts user input (text, email, password, etc.) |
<textarea> | Allows multiline text input |
<button> | Submits the form |
<label> | Associates text with an input field |
Input Types
| Type | Purpose |
|---|---|
text | Single-line text input |
email | Email validation input |
password | Hides user input for passwords |
number | Accepts numerical values |
radio | Select one option from multiple choices |
checkbox | Select multiple options |
date | Select a date |
file | Upload a file |
Example: Form with Various Input Types
<form>
  <label for="username">Username:</label>
  <input type="text" id="username" name="username" required />

  <label for="password">Password:</label>
  <input type="password" id="password" name="password" required />

  <label>Gender:</label>
  <input type="radio" id="male" name="gender" value="male" />
  <label for="male">Male</label>
  <input type="radio" id="female" name="gender" value="female" />
  <label for="female">Female</label>

  <label for="hobbies">Hobbies:</label>
  <input type="checkbox" id="sports" name="hobbies" value="sports" />
  <label for="sports">Sports</label>
  <input type="checkbox" id="music" name="hobbies" value="music" />
  <label for="music">Music</label>

  <label for="dob">Date of Birth:</label>
  <input type="date" id="dob" name="dob" />

  <button type="submit">Register</button>
</form>
Deep Dive into HTML Forms
Form Validation (Client-Side)
HTML provides built-in validation for form fields to ensure users enter correct data.
Example of validation using required, minlength, and pattern:
<input type="text" name="username" required minlength="4" />
<input type="email" name="email" required />
<input type="password" name="password" required pattern=".{6,}" />
Accessibility in Forms
- Use
<label>for all input fields. - Use
aria-labeloraria-describedbyfor better screen reader support.
Comments & VS Code Keyboard Shortcuts
How to Use Comments?
- Comments improve readability and explain complex code.
- In HTML:
<!-- This is a comment -->
VS Code Keyboard Shortcuts
| Shortcut | Function |
|---|---|
Ctrl + / | Toggle comments |
Ctrl + D | Select next occurrence |
Alt + Shift + ↓ / ↑ | Duplicate line |
Ctrl + P | Quick file open |
Ctrl + Shift + X | Open extensions menu |
Real-World Web Page Examples
Discussing Offline Meetings & Upcoming Tasks
- Should we schedule in-person meetups?
- Assigning tasks for members:
- Build a semantic webpage.
- Create a form with validation.
Task
Make a Wep page that contain:
- A Good structure
HTMLpage that follow the semantic tags and the comments - A form with all inputs types.
- A submit button with a
resetbutton.
Wrap-Up
Key Takeaways
- Semantic HTML improves accessibility and SEO.
- Forms allow users to input and submit data.
- Different input types serve different purposes.
- Validation helps maintain data quality.
- Important Links
Next Steps
- In the next session, we will explore Accessibility, media embedding.
Lecture 3: Web Accessibility
1. Key Accessibility Concepts
Alternative Text (alt)
- The
altattribute provides alternative text for images, improving screen reader accessibility. - If an image is purely decorative, an empty
alt=""can be used.
ARIA Labels & Descriptions
aria-labelandaria-describedbyenhance accessibility by providing additional descriptions for elements.- Useful for buttons, icons, and interactive elements that lack visible labels.
Contrast
- Sufficient contrast between text and background is necessary for readability.
- Tools like WebAIM contrast checker can help ensure compliance with WCAG standards.
Semantic HTML
- Using correct HTML elements (
<header>,<nav>,<article>,<section>,<footer>, etc.) improves screen reader navigation. - Avoid unnecessary
<div>elements when semantic tags are available.
Headings
- Proper use of
<h1>to<h6>creates a logical document structure. - Avoid skipping heading levels (e.g., jumping from
<h1>to<h3>).
Language Attribute in HTML
- Use the
langattribute to specify the document language. Example:<html lang="en">. - Accessibility guidelines for content:
- Use short, clear sentences.
- Avoid excessive symbols that may confuse screen readers.
- Maintain formal and professional language.
Good Link Text
- Use descriptive text for links instead of generic terms like "Click here."
- Example:
- Bad:
<a href="docs.pdf">Click here</a> - Good:
<a href="docs.pdf">Download the documentation</a>
- Bad:
Tables and Accessibility
- Use
<th>for table headers and<caption>for descriptions. - Use lists (
<ol>,<ul>,<li>,<p>) where possible instead of tables. - Avoid using tables for layout – use CSS Grid or Flexbox instead.
- Use
scope="row"orscope="col"to define relationships between table headers and data. - Use
colspanorrowspanto merge cells when needed. - Assign
idattributes to link cells with headers.
Data Attributes for Accessibility
- Use
data-messageandtabindexto enhance accessibility. - Example
<input type="text" data-message="Enter your name" tabindex="0" />
Captions & Figures
-
Use
<caption>for tables and<figcaption>for images. -
Example:
<figure> <img src="diagram.jpg" alt="System architecture diagram" /> <figcaption>Diagram showing system architecture.</figcaption> </figure> -
Sometimes, an empty
alt=""is acceptable for decorative images.
Role Attribute & Media Embedding
- Use the
roleattribute to define the purpose of elements (e.g.,role="navigation",role="button"). - Ensure media elements (
<video>&<audio>) have captions, transcripts, or alternative text.
Task: Create an Accessible Webpage
Requirements
- Design a webpage that follows all accessibility best practices covered in this lecture.
- Ensure proper use of:
- Semantic HTML elements
altattributes for images- ARIA attributes where necessary
- Contrast and readable fonts
- Accessible tables and forms
- Properly structured headings
- Captions for media
Hint
- Use the WAVE Accessibility Evaluation Tool or Lighthouse in Chrome DevTools to test your webpage.
- Validate your HTML using W3C Validator.
Bonus
Search for Virion control and the difference between
gitandgitHub
Git and GitHub: A Comprehensive Guide
Brief History of Git
Git was created by Linus Torvalds in 2005 for the development of the Linux kernel. It was designed to be fast, efficient, and support distributed, non-linear workflows. Before Git, Torvalds used BitKeeper, but after a controversy regarding its license, he decided to create his own version control system.
What is Git?
Git is a distributed version control system that tracks changes in any set of computer files. It is designed for coordinating work among programmers, but can be used to track changes in any set of files. Its goals include speed, data integrity, and support for distributed, non-linear workflows.
What is Version Control?
Version control is a system that records changes to a file or set of files over time so that you can recall specific versions later. It allows you to:
- Revert files back to a previous state
- Revert the entire project back to a previous state
- Compare changes over time
- See who last modified something that might be causing a problem
- Who introduced an issue and when
Difference between Git and GitHub
- Git is a version control system that lets you manage and keep track of your source code history.
- GitHub is a cloud-based hosting service that lets you manage Git repositories. It provides a web-based graphical interface and adds many features including access control, collaboration features, bug tracking, feature requests, etc.
In simple terms, Git is the tool, GitHub is a service that hosts Git repositories.
How to Set Up Git
For Windows
- Download Git from Download git from here
- Run the installer with default options or your best preference
- Verify installation by opening a terminal/command prompt and typing:
git --version
For Linux
-
For Debian/Ubuntu/Arch-based distributions:
sudo apt-get update
sudo apt-get install git
For Fedora:
sudo dnf install gitFor CentOS/RHEL:
sudo yum install gitFor Arch/EndeavourOS/Manjaro
Sudo pacman -S git -
Verify installation:
git --version
For Mac
-
Install using Homebrew (recommended):
/bin/bash -c "$(curl -fsSL https://raw.githubusercontent.com/Homebrew/install/HEAD/install.sh)"
brew install git
Alternatively, download the installer from git-scm.com
-
Verify installation:
git --version
Git Configuration
Git configuration lets you customize how Git works. Configuration can be at three levels:
- System level: affects all users on the system
- Global level: affects all repositories for the current user
- Local level: specific to the current repository
What is --global?
The --global flag in Git configuration commands sets configurations for the current user across all repositories. For example:
git config --global user.name "Your Name"
git config --global user.email "your.email@example.com"
Basic Git Commands
git init
Initializes a new Git repository in the current directory:
git init
This creates a new .git subdirectory that contains all the metadata for the new repository.
git add
Adds files to the staging area (prepares them for commit):
git add filename    # Add a specific file
git add .           # Add all modified files
git commit
Records changes to the repository with a descriptive message:
git commit -m "Your descriptive message about the changes"
Branches in Git
What are Branches and Why Use Them?
Branches are separate lines of development that allow you to work on different features or fixes simultaneously without affecting the main codebase (usually the main branch). Benefits include:
- Work on features in isolation
- Multiple developers can work simultaneously on different features
- Experimentation without affecting the main codebase
- Easier to manage releases and hot fixes
git branch
Used to list, create, or delete branches:
git branch                  # List all local branches
git branch branch-name      # Create a new branch
git branch -d branch-name   # Delete a branch
git checkout and git switch
Both commands help you navigate between branches:
git checkout:
git checkout branch-name         # Switch to an existing branch
git checkout -b new-branch-name  # Create a new branch and switch to it
git switch (newer alternative):
git switch branch-name           # Switch to an existing branch
git switch -c new-branch-name    # Create a new branch and switch to it
git merge
Combines changes from different branches:
git merge branch-name # Merges branch-name into the current branch
What is a Conflict?
A conflict occurs when Git can't automatically resolve differences in code between two commits. This typically happens when two branches have made changes to the same part of the same file. When a conflict occurs, Git will mark the file as conflicted and halt the merging process, requiring manual resolution.
Remote Repositories
What is a Remote Repository?
A remote repository is a version of your project hosted on the internet or network. It allows collaboration with other developers by providing a central location where everyone can push their changes and pull others' changes.
Git Remote Commands
Git provides several commands to manage remote repositories:
git remote
Lists the remote connections you have to other repositories:
git remote            # Shows short names of remotes
git remote -v         # Shows URLs of remotes with their names
git remote add
Adds a new remote repository connection:
git remote add <name> <url>
# Example:
git remote add origin https://github.com/username/repository.git
"Origin" is the conventional name for the primary remote repository.
git remote remove
Removes a remote connection:
git remote remove <name>
# Example:
git remote remove origin
git remote rename
Renames a remote connection:
git remote rename <old-name> <new-name>
# Example:
git remote rename origin upstream
git remote set-url
Changes the URL of an existing remote:
git remote set-url <name> <new-url>
# Example:
git remote set-url origin https://github.com/username/new-repository.git
Push to Your Remote Repository
Uploading your local commits to a remote repository:
git push origin branch-name
Additional push options:
git push -u origin branch-name  # Sets up tracking relationship
git push --force                # Forces push (use with caution!)
git push --all                  # Pushes all branches
Pull from the Remote Repository
Downloading changes from the remote repository to your local repository:
git pull origin branch-name
Alternative approach using fetch and merge:
git fetch origin           # Downloads changes without merging
git merge origin/branch    # Merges downloaded changes
git fetch vs git pull
git fetchonly downloads new data from the remote repository but doesn't integrate it into your working filesgit pullis essentially agit fetchfollowed by agit merge- it downloads AND integrates changes
GitHub as a Remote Repository
GitHub is one of the most popular hosting services for Git repositories. It provides:
- Hosting for repositories
- Web interface for Git
- Issue tracking
- Pull requests for code review
- Actions for continuous integration
- Project management tools
git clone
Creates a copy of a remote repository on your local machine:
git clone https://github.com/username/repository.git
Advanced: GitHub Authentication with Personal Access Tokens
As of August 13, 2021, GitHub no longer accepts password authentication for Git operations. Instead, you need to use a Personal Access Token (PAT) when authenticating with GitHub from the command line.
What is a Personal Access Token?
A Personal Access Token is an alternative to using passwords for authentication to GitHub when using the GitHub API or the command line. PATs are more secure than passwords because:
- They are specific to GitHub
- They can be scoped to allow specific access permissions
- They can be revoked at any time without needing to change your password
How to Generate a Personal Access Token
- Log in to your GitHub account
- Click on your profile photo in the top-right corner and select "Settings"
- In the left sidebar, click on "Developer settings"
- In the left sidebar, click on "Personal access tokens" then "Tokens (classic)"
- Click "Generate new token" and select "Generate new token (classic)"
- Give your token a descriptive name
- Select the scopes (permissions) you want to grant this token
- For basic repository access, select "repo"
- For public repositories only, select "public_repo"
- Click "Generate token"
- Copy your new personal access token immediately! GitHub will only show it once.
Using Your Personal Access Token
When pushing to or pulling from GitHub using HTTPS, you'll be asked for your username and password:
git push origin main
Instead of your GitHub password, enter your personal access token when prompted.
Including PAT in URLs
You can also include your Personal Access Token directly in the Git URL to avoid being prompted for credentials:
# When cloning a repository
git clone https://TOKEN@github.com/username/repository.git

# When adding a remote
git remote add origin https://TOKEN@github.com/username/repository.git
Replace TOKEN with your actual Personal Access Token. For example:
Warning: Using this method may expose your token in your shell history and is not recommended for shared environments. Be careful not to commit these URLs to your repository.
Token Security Best Practices
- Never share your tokens or check them into version control
- Set an expiration date for your tokens
- Use the minimum scopes necessary for your needs
- Regularly review and revoke unused tokens
- Consider using GitHub CLI or SSH keys for authentication as alternatives
Tips for Front-End Developers
- Use branches for features and bug fixes
- Commit often with meaningful messages
- Create a
.gitignorefile for node_modules and build files - Use pull requests for code review
- Learn to resolve merge conflicts efficiently
- Consider using Git hooks for linting before commits
- Use semantic versioning for your projects
GitHub Pages and How to Use Them
GitHub Pages is a free hosting service provided by GitHub that allows you to host static websites directly from your GitHub repository.
How to Set Up GitHub Pages
- Create a repository named
username.github.io(replace "username" with your GitHub username) - Clone the repository to your local machine
- Create a new repository
- Add your web files (HTML, CSS, JS)
- Scroll down to "GitHub Pages" section
- Choose which branch to publish (usually
mainormaster) - Save and visit the provided URL
Task
Make your local repo that has a good structure with an index.html page and README file.
Hint: A well-structured HTML page is a
semantic HTMLpage that includescomments.
The index.html page must include a line that says "Welcome to my web page I am [your name]".
Use GitHub Pages to deploy your webpage.
Steps to Complete the Task
- Create a new repository locally using
git init - Create a structured index.html with semantic HTML
- Create a README.md file explaining your project
- Commit your changes
- Create a repository on GitHub
- Connect your local repo to GitHub and push
- Enable GitHub Pages in the repository settings
CSS Topics
1. Introduction to CSS
- What is CSS and why it's important
- How CSS works with HTML
- Three ways to include CSS (inline, internal, external)
- Basic syntax (selectors, properties, values)
2. CSS Selectors
- Why we use selectors
- Element selectors
- Class and ID selectors
- Descendant, child, and sibling selectors
- Attribute selectors
- Pseudo-classes and pseudo-elements (difference)
- Specificity and cascade rules (Who will win) (super power word is
!important)
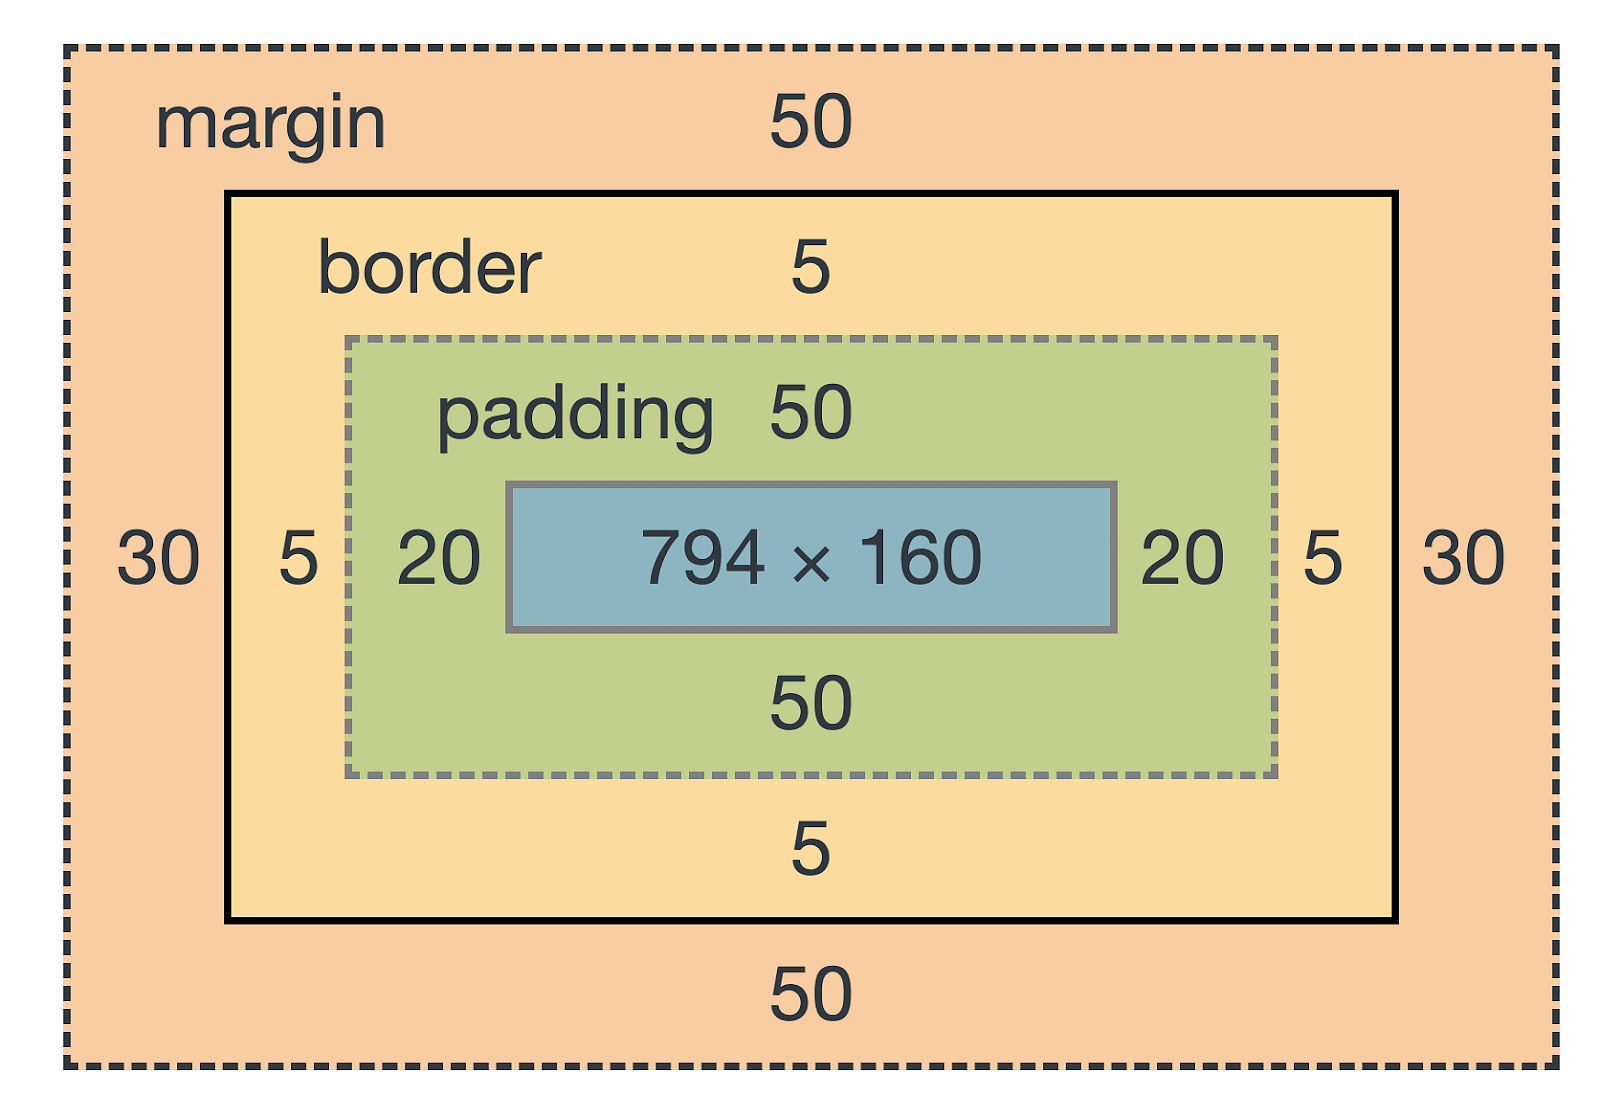
3. The Box Model
- Content, padding, border, and margin
- Width and height properties
- Box-sizing property
- Border properties and styling
- Margin collapsing behavior
4. Typography and Text Styling
- Font properties (family, size, weight, style)
- Text properties (alignment, decoration, spacing)
- Web fonts and @font-face
- Line height and letter spacing
- Text effects and shadows
5. Colors and Backgrounds
- Color formats (names, hex, RGB, HSL)
- Background properties
- Gradients
- Opacity and transparency
- Background images and positioning
6. Layout Fundamentals
- Display property (block, inline, inline-block, flex, grid)
- Position property (static, relative, absolute, fixed, sticky)
- Float and clear
- z-index and stacking context
- Overflow handling
7. FlexBox Layout
- Flex container and flex items
- Main axis and cross axis
- Flex direction and wrapping
- Justifying and aligning content
- Flex grow, shrink, and basis
8. CSS Grid Layout
- Grid containers and grid items
- Creating rows and columns
- Grid template areas
- Grid positioning and spanning
- Responsive grids
9. Responsive Design
- Media queries
- Viewport units
- Flexible images
- Mobile-first approach
- Common breakpoints
10. Transitions and Animations
- Transition properties
- Timing functions
- Animation keyframes
- Animation properties
- Performance considerations
11. CSS Variables (Custom Properties)
- Declaring and using variables
- Scope and inheritance
- Dynamic updates with JavaScript
- Theming applications
12. CSS Preprocessors and Modern Workflows
- Introduction to SASS/SCSS
- Nesting rules
- Mixins and functions
- CSS frameworks overview
- CSS Modules and CSS-in-JS concepts
13. Advanced Techniques
- CSS Shapes and Clipping
- Multi-column layouts
- Filter effects
- Masking techniques
- Print stylesheets
14. Best Practices and Organization
- CSS naming conventions (BEM, SMACSS)
- CSS architecture
- Performance optimization
- Browser compatibility
- Debugging techniques
CSS Topics - Comprehensive Documentation
1. Introduction to CSS
What is CSS and Why It Matters
CSS (Cascading Style Sheets) is a style sheet language used to describe the presentation of a document written in HTML. CSS separates content from design, allowing developers to control layout, colors, fonts, and other visual aspects of web pages.
Benefits of CSS
| Benefit | Description |
|---|---|
| Separation of concerns | Keeps content (HTML) separate from presentation (CSS) |
| Consistency | Ensures uniform styling across multiple pages |
| Performance | Improves page load times through caching |
| Accessibility | Enhances site usability for diverse users |
| Responsiveness | Enables adaptive layouts for different devices |
How CSS Works with HTML
CSS works by selecting HTML elements and applying styles to them. The browser reads the HTML document first, creates the Document Object Model (DOM), then applies CSS rules to elements in the DOM.
Three Ways to Include CSS
1. Inline CSS
<p style="color: red; font-size: 16px;">This text is red and 16px.</p>
2. Internal (Embedded) CSS
<head>
  <style>
    p {
      color: blue;
      font-size: 14px;
    }
  </style>
</head>
3. External CSS (Recommended)
HTML file:
<head>
  <link rel="stylesheet" href="styles.css" />
</head>
styles.css:
p {
  color: green;
  font-size: 18px;
}
| Method | Pros | Cons |
|---|---|---|
| Inline | Immediate application | Mixes content and presentation; Not reusable |
| Internal | No extra files | Increases page size; Not cacheable |
| External | Separation of concerns; Cacheable | Extra HTTP request |
Basic Syntax
selector {
  property: value;
  another-property: value;
}
Example:
h1 {
  color: purple;
  font-size: 24px;
  margin-bottom: 10px;
}
2. CSS Selectors
Why We Use Selectors
Selectors allow us to target specific HTML elements for styling. They're the bridge between HTML and CSS rules.
Types of CSS Selectors
| Selector Type | Syntax | Example | Description |
|---|---|---|---|
| Element | element | p { color: blue; } | Targets all instances of an element |
| Class | .classname | .important { font-weight: bold; } | Targets elements with specific class |
| ID | #idname | #header { background: #333; } | Targets element with specific ID |
| Descendant | ancestor descendant | article p { font-style: italic; } | Targets descendants |
| Child | parent > child | ul > li { list-style: square; } | Targets direct children only |
| Adjacent Sibling | element + element | h2 + p { text-indent: 20px; } | Targets adjacent sibling |
| General Sibling | element ~ element | h3 ~ p { color: gray; } | Targets all following siblings |
/* Descendant selector: paragraphs inside articles */
article p {
  font-style: italic;
}

/* Child selector: list items that are direct children of unordered lists */
ul > li {
  list-style-type: square;
  color: #444;
}

/* Adjacent sibling: paragraphs immediately following h2 */
h2 + p {
  text-indent: 20px;
  font-size: 1.1em;
}

/* General sibling: all paragraphs after h3 within the same parent */
h3 ~ p {
  color: gray;
  margin-left: 1rem;
}
Attribute Selectors
| Selector | Example | Description |
|---|---|---|
| [attr] | [disabled] | Elements with the attribute |
| [attr="value"] | [type="checkbox"] | Elements with specific attribute value |
| [attr*="value"] | [class*="btn"] | Elements with attributes containing value |
| [attr^="value"] | [href^="https"] | Elements with attributes starting with value |
| [attr$="value"] | [src$=".jpg"] | Elements with attributes ending with value |
/* Elements with disabled attribute */
[disabled] {
  opacity: 0.5;
  cursor: not-allowed;
}

/* Input elements of type checkbox */
[type="checkbox"] {
  margin-right: 5px;
  width: 16px;
  height: 16px;
}

/* Elements with class containing "btn" */
[class*="btn"] {
  cursor: pointer;
  display: inline-block;
}

/* All links starting with https */
[href^="https"] {
  color: green;
  padding-right: 20px;
  background: url("lock-icon.svg") no-repeat right;
}

/* All images ending with .jpg */
[src$=".jpg"] {
  border: 1px solid #ddd;
  padding: 3px;
}
Pseudo-classes and Pseudo-elements
Pseudo-classes (State or Position)
a:link {
  color: blue;
}
a:visited {
  color: purple;
}
a:hover {
  text-decoration: underline;
}
a:active {
  color: red;
}
li:first-child {
  font-weight: bold;
}
li:last-child {
  margin-bottom: 0;
}
tr:nth-child(even) {
  background-color: #f2f2f2;
}
Pseudo-elements (Parts of Elements)
p::first-line {
  font-variant: small-caps;
}
p::first-letter {
  font-size: 200%;
  float: left;
}
.note::before {
  content: "Note: ";
  font-weight: bold;
}
a::after {
  content: " ↗";
}
::selection {
  background-color: yellow;
  color: black;
}
Specificity and Cascade Rules
| Selector Type | Specificity Value | Example |
|---|---|---|
| Element selectors | 1 | p { color: blue; } |
| Class, attribute, pseudo-class | 10 | .content p { color: red; } |
| ID selectors | 100 | #main .content p { color: green; } |
| Inline styles | 1000 | <p style="color: orange;"> |
| !important | Overrides all | p { color: yellow !important; } |
3. The Box Model
Components of the Box Model
| Component | Description | CSS Properties |
|---|---|---|
| Content | The actual content (text, images) | width, height |
| Padding | Space between content and border | padding-top, padding-right, padding-bottom, padding-left, padding |
| Border | Boundary around padding | border-width, border-style, border-color, border |
| Margin | Space outside the border | margin-top, margin-right, margin-bottom, margin-left, margin |
Width and Height Properties
div {
  width: 300px;
  height: 200px;

  width: 50%;
  height: 50%;

  min-width: 200px;
  max-width: 800px;
  min-height: 100px;
  max-height: 600px;
}
Box-sizing Property
| Value | Description | Example |
|---|---|---|
| content-box | Default - width/height only include content area | width: 300px; (Total: 300px + padding + border) |
| border-box | Width/height include content, padding, and border | width: 300px; (Total: exactly 300px) |
* {
  box-sizing: border-box;
}
Border Properties and Styling
div {
  border-top: 1px solid black;
  border-right: 2px dashed red;
  border-bottom: 3px dotted green;
  border-left: 4px double blue;

  border-radius: 10px;

  border-top-left-radius: 5px;
  border-top-right-radius: 10px;
  border-bottom-right-radius: 15px;
  border-bottom-left-radius: 20px;

  border-radius: 50%;
}
Margin Collapsing Behavior
When two vertical margins meet, they collapse to the larger of the two margins.
.box1 {
  margin-bottom: 20px;
}

.box2 {
  margin-top: 30px;
}
| Prevention Method | How It Works |
|---|---|
| Add border/padding | Creates separation between margins |
| Use flexbox/grid | These layouts don't have margin collapse |
| Use inline-block | Inline-block elements don't collapse margins |
4. Typography and Text Styling

Font Properties
| Property | Values | Example |
|---|---|---|
| font-family | Family names, generic families | font-family: 'Helvetica Neue', Arial, sans-serif; |
| font-size | px, em, rem, %, vw | font-size: 16px; font-size: 1.2rem; |
| font-weight | normal/400, bold/700, 100-900 | font-weight: bold; font-weight: 600; |
| font-style | normal, italic, oblique | font-style: italic; |
| font-variant | normal, small-caps | font-variant: small-caps; |
Text Properties
| Property | Values | Example |
|---|---|---|
| text-align | left, right, center, justify | text-align: center; |
| text-decoration | none, underline, overline, line-through | text-decoration: underline; |
| text-transform | none, uppercase, lowercase, capitalize | text-transform: uppercase; |
| text-indent | length | text-indent: 30px; |
| letter-spacing | normal, length | letter-spacing: 1px; |
| word-spacing | normal, length | word-spacing: 2px; |
Web Fonts and @font-face
Using Google Fonts:
<link
  href="https://fonts.googleapis.com/css2?family=Roboto:wght@400;700&display=swap"
  rel="stylesheet"
/>
body {
  font-family: "Roboto", sans-serif;
}
Using @font-face:
@font-face {
  font-family: "MyCustomFont";
  src: url("fonts/custom-font.woff2") format("woff2"), url("fonts/custom-font.woff")
      format("woff");
  font-weight: normal;
  font-style: normal;
}

body {
  font-family: "MyCustomFont", sans-serif;
}
Line Height and Letter Spacing
p {
  line-height: 1.5;
  line-height: 24px;
  line-height: 150%;

  letter-spacing: 1px;

  word-spacing: 2px;
}
Text Effects and Shadows
h1 {
  text-shadow: 2px 2px 4px rgba(0, 0, 0, 0.5);

  text-shadow: 1px 1px 2px black, 0 0 25px blue, 0 0 5px darkblue;
}
5. Colors and Backgrounds
Color Formats
| Format | Syntax | Example | Notes |
|---|---|---|---|
| Color names | color name | color: red; | Limited palette |
| Hexadecimal | #RRGGBB | color: #ff0000; | 6 digits for RGB |
| Hex shorthand | #RGB | color: #f00; | Shorthand when possible |
| Hex with alpha | #RRGGBBAA | color: #ff000080; | 8 digits with alpha |
| RGB | rgb(r, g, b) | color: rgb(255, 0, 0); | Values 0-255 |
| RGBA | rgba(r, g, b, a) | color: rgba(255, 0, 0, 0.5); | Alpha 0-1 |
| HSL | hsl(h, s%, l%) | color: hsl(0, 100%, 50%); | Hue 0-360, S/L 0-100% |
| HSLA | hsla(h, s%, l%, a) | color: hsla(0, 100%, 50%, 0.5); | With alpha 0-1 |
Background Properties
div {
  background-color: #f0f0f0;

  background-image: url("image.jpg");

  background-repeat: repeat;
  background-repeat: no-repeat;
  background-repeat: repeat-x;
  background-repeat: repeat-y;

  background-position: center;
  background-position: top right;
  background-position: 25% 75%;
  background-position: 20px 50px;

  background-size: auto;
  background-size: cover;
  background-size: contain;
  background-size: 50% auto;
  background-size: 200px 100px;

  background-attachment: scroll;
  background-attachment: fixed;
  background-attachment: local;

  background: #f0f0f0 url("image.jpg") no-repeat center/cover fixed;
}
Gradients
| Gradient Type | Syntax | Example |
|---|---|---|
| Linear | linear-gradient(direction, color1, color2, ...) | linear-gradient(to right, red, yellow); |
| Radial | radial-gradient(shape, color1, color2, ...) | radial-gradient(circle, red, yellow); |
| Conic | conic-gradient(color1, color2, ...) | conic-gradient(red, yellow, green, blue); |
| Repeating | repeating-linear-gradient(...) | repeating-linear-gradient(45deg, red, blue 10%); |
Opacity and Transparency
div {
  opacity: 0.7;

  background-color: rgba(255, 0, 0, 0.5);

  background-color: rgba(0, 0, 0, 0.7);
  color: white;
}
Multiple Backgrounds
div {
  background-image: url("foreground.png"), url("middle-ground.png"),
    url("background.png");

  background-position: top left, center, bottom right;

  background-size: auto, 50% auto, cover;

  background-repeat: no-repeat, no-repeat, repeat;
}
6. Layout Fundamentals
Display Property Values
| Value | Description | Use Case |
|---|---|---|
| block | Full width, new line before and after | Divs, paragraphs, headers |
| inline | Only as wide as content, no line breaks | Spans, anchors, em, strong |
| inline-block | Inline, but can set width/height | Navigation items, buttons |
| none | Removes from layout completely | Hidden elements |
| flex | Flexbox container | Flexible layouts |
| grid | Grid container | Two-dimensional layouts |
div {
  display: block;
  display: inline;
  display: inline-block;
  display: none;
  display: flex;
  display: grid;
  display: table;
  display: contents;

  visibility: hidden;
}
Position Property
| Value | Description | Offset Properties | Example |
|---|---|---|---|
| static | Default - normal flow | None | position: static; |
| relative | Relative to normal position | top, right, bottom, left | position: relative; top: 10px; |
| absolute | Relative to nearest positioned ancestor | top, right, bottom, left | position: absolute; top: 0; |
| fixed | Relative to viewport | top, right, bottom, left | position: fixed; bottom: 20px; |
| sticky | Relative until scroll threshold, then fixed | top, right, bottom, left | position: sticky; top: 0; |
Float and Clear
.float-left {
  float: left;
  margin-right: 15px;
}

.float-right {
  float: right;
  margin-left: 15px;
}

.clear {
  clear: both;
}

.clearfix::after {
  content: "";
  display: table;
  clear: both;
}
Z-index and Stacking Context
.back-layer {
  position: relative;
  z-index: 1;
}

.middle-layer {
  position: relative;
  z-index: 2;
}

.front-layer {
  position: relative;
  z-index: 3;
}
Overflow Handling
| Value | Description | Example |
|---|---|---|
| visible | Content flows outside | overflow: visible; |
| hidden | Clips content | overflow: hidden; |
| scroll | Always shows scrollbars | overflow: scroll; |
| auto | Shows scrollbars when needed | overflow: auto; |
div {
  overflow-x: scroll;
  overflow-y: hidden;

  white-space: nowrap;
  overflow: hidden;
  text-overflow: ellipsis;
}
7. FlexBox Layout
Flex Container and Items
.container {
  display: flex;
}
Main Axis and Cross Axis
| Direction | Main Axis | Cross Axis |
|---|---|---|
| row | Horizontal (left to right) | Vertical (top to bottom) |
| row-reverse | Horizontal (right to left) | Vertical (top to bottom) |
| column | Vertical (top to bottom) | Horizontal (left to right) |
| column-reverse | Vertical (bottom to top) | Horizontal (left to right) |
Flex Container Properties
| Property | Values | Description |
|---|---|---|
| flex-direction | row, row-reverse, column, column-reverse | Direction of main axis |
| flex-wrap | nowrap, wrap, wrap-reverse | How items wrap |
| justify-content | flex-start, flex-end, center, space-between, space-around, space-evenly | Alignment along main axis |
| align-items | stretch, flex-start, flex-end, center, baseline | Alignment along cross axis |
| align-content | flex-start, flex-end, center, space-between, space-around, stretch | Alignment of wrapped lines |
.container {
  flex-direction: row;
  flex-direction: row-reverse;
  flex-direction: column;
  flex-direction: column-reverse;

  flex-wrap: nowrap;
  flex-wrap: wrap;
  flex-wrap: wrap-reverse;

  flex-flow: column wrap;
}
Flex Item Properties
| Property | Values | Description |
|---|---|---|
| flex-grow | number (default 0) | Growth factor |
| flex-shrink | number (default 1) | Shrink factor |
| flex-basis | auto, 0, length, % | Initial size |
| align-self | auto, flex-start, flex-end, center, baseline, stretch | Override container's align-items |
| order | number (default 0) | Controls order of items |
.item {
  flex-grow: 0;
  flex-grow: 1;
  flex-grow: 2;

  flex-shrink: 1;
  flex-shrink: 0;

  flex-basis: auto;
  flex-basis: 0;
  flex-basis: 25%;
  flex-basis: 200px;

  flex: 0 1 auto;
  flex: 1;
  flex: auto;
  flex: none;

  align-self: flex-start;
  align-self: center;
  align-self: flex-end;

  order: -1;
  order: 0;
  order: 1;
}
8. CSS Grid Layout
Grid Container and Grid Items
.container {
  display: grid;
}
Defining Grid Structure
| Property | Description | Example |
|---|---|---|
| grid-template-columns | Defines columns | grid-template-columns: 100px 200px 100px; |
| grid-template-rows | Defines rows | grid-template-rows: 100px 200px; |
| gap | Sets spacing between cells | gap: 10px; |
.container {
  grid-template-columns: 100px 200px 100px;
  grid-template-columns: 1fr 2fr 1fr;
  grid-template-columns: repeat(3, 1fr);
  grid-template-columns: minmax(100px, 1fr) 2fr;
  grid-template-columns: auto 1fr auto;

  grid-template-rows: 100px 200px;
  grid-template-rows: repeat(3, 100px);
  grid-template-rows: auto;

  column-gap: 20px;
  row-gap: 10px;
  gap: 10px 20px;
  gap: 15px;
}
Grid Template Areas
.container {
  grid-template-areas:
    "header header header"
    "sidebar content content"
    "footer footer footer";

  grid-template-columns: 1fr 3fr 1fr;
  grid-template-rows: auto 1fr auto;
}

.header {
  grid-area: header;
}

.sidebar {
  grid-area: sidebar;
}

.content {
  grid-area: content;
}

.footer {
  grid-area: footer;
}
Grid Item Placement
| Property | Description | Example |
|---|---|---|
| grid-column | Column start/end | grid-column: 1 / 3; |
| grid-row | Row start/end | grid-row: 2 / 4; |
| grid-area | Row start / column start / row end / column end | grid-area: 2 / 1 / 4 / 3; |
.item {
  grid-column-start: 1;
  grid-column-end: 3;
  grid-row-start: 2;
  grid-row-end: 4;

  grid-column: 1 / 3;
  grid-row: 2 / 4;

  grid-column: 1 / span 2;
  grid-row: 2 / span 2;

  grid-area: 2 / 1 / 4 / 3;

  grid-area: header;

  justify-self: start;
  justify-self: center;
  justify-self: end;
  justify-self: stretch;

  align-self: start;
  align-self: center;
  align-self: end;
  align-self: stretch;
}
Responsive Grid Patterns
.container {
  grid-template-columns: repeat(auto-fill, minmax(200px, 1fr));

  grid-template-columns: repeat(auto-fit, minmax(200px, 1fr));
}

@media (min-width: 600px) {
  .container {
    grid-template-columns: repeat(2, 1fr);
  }
}

@media (min-width: 900px) {
  .container {
    grid-template-columns: repeat(3, 1fr);
  }
}
9. Responsive Design
Media Query Syntax and Features
@media screen and (max-width: 600px) {
  body {
    font-size: 14px;
  }
}

@media screen and (min-width: 601px) and (max-width: 900px) {
  body {
    font-size: 16px;
  }
}

@media screen {
}
@media print {
}
@media speech {
}
@media all {
}

@media (orientation: landscape) {
}
@media (orientation: portrait) {
}
@media (prefers-color-scheme: dark) {
}
@media (prefers-reduced-motion) {
}
@media (hover: hover) {
}
Common Breakpoints
| Device Category | Breakpoint | Media Query |
|---|---|---|
| Small phones | < 576px | @media (max-width: 576px) { } |
| Tablets | 577px - 768px | @media (min-width: 577px) and (max-width: 768px) { } |
| Desktops | 769px - 992px | @media (min-width: 769px) and (max-width: 992px) { } |
| Large desktops | 993px - 1200px | @media (min-width: 993px) and (max-width: 1200px) { } |
| Extra large | > 1200px | @media (min-width: 1201px) { } |
Viewport Units
| Unit | Description | Example |
|---|---|---|
| vw | 1% of viewport width | width: 50vw; |
| vh | 1% of viewport height | height: 100vh; |
| vmin | 1% of smaller dimension | font-size: 5vmin; |
| vmax | 1% of larger dimension | padding: 3vmax; |
div {
  width: 50vw;
  height: 100vh;
  margin-top: 10vh;
  font-size: 5vmin;
  padding: 3vmax;

  width: calc(100vw - 20px);
}
Responsive Images
img {
  max-width: 100%;
  height: auto;

  object-fit: cover;
  object-fit: contain;
  object-position: center;
}

div {
  background-image: url("image.jpg");
  background-size: cover;
  background-position: center;
}
Mobile-First Approach
.container {
  padding: 10px;
}

@media (min-width: 768px) {
  .container {
    padding: 20px;
    display: flex;
  }
}

@media (min-width: 1024px) {
  .container {
    padding: 30px;
    max-width: 1200px;
    margin: 0 auto;
  }
}
10. Transitions and Animations
Transition Properties
| Property | Description | Example |
|---|---|---|
| transition-property | Properties to animate | transition-property: background-color; |
| transition-duration | Duration of transition | transition-duration: 0.3s; |
| transition-timing-function | Speed curve | transition-timing-function: ease; |
| transition-delay | Delay before starting | transition-delay: 0.1s; |
button {
  background-color: blue;
  color: white;
  padding: 10px 20px;

  transition-property: background-color, transform;
  transition-duration: 0.3s;
  transition-timing-function: ease;
  transition-delay: 0s;

  transition: background-color 0.3s ease, transform 0.3s ease-in-out 0.1s;
}

button:hover {
  background-color: darkblue;
  transform: scale(1.1);
}
Timing Functions
| Function | Description | Visual Representation |
|---|---|---|
| ease | Start slow, fast, end slow | ⟿ |
| linear | Constant speed | ⟼ |
| ease-in | Start slow | ⟾ |
| ease-out | End slow | ⟿ |
| ease-in-out | Start and end slow | ⟿⟾ |
div {
  transition-timing-function: ease;
  transition-timing-function: linear;
  transition-timing-function: ease-in;
  transition-timing-function: ease-out;
  transition-timing-function: ease-in-out;

  transition-timing-function: cubic-bezier(0.25, 0.1, 0.25, 1);

  transition-timing-function: steps(4, end);
}
Animation Keyframes
@keyframes slide-in {
  0% {
    transform: translateX(-100%);
    opacity: 0;
  }

  60% {
    transform: translateX(10%);
  }

  100% {
    transform: translateX(0);
    opacity: 1;
  }
}

@keyframes fade {
  from {
    opacity: 0;
  }
  to {
    opacity: 1;
  }
}
Animation Properties
| Property | Description | Example |
|---|---|---|
| animation-name | Name of the keyframe | animation-name: slide-in; |
| animation-duration | Duration of animation | animation-duration: 1s; |
| animation-timing-function | Speed curve | animation-timing-function: ease-out; |
| animation-delay | Delay before starting | animation-delay: 0.5s; |
| animation-iteration-count | How many times | animation-iteration-count: infinite; |
| animation-direction | Direction of play | animation-direction: alternate; |
| animation-fill-mode | Before/after states | animation-fill-mode: forwards; |
.element {
  animation-name: slide-in;
  animation-duration: 1s;
  animation-timing-function: ease-out;
  animation-delay: 0.5s;
  animation-iteration-count: 1;
  animation-direction: normal;
  animation-fill-mode: forwards;
  animation-play-state: running;

  animation: slide-in 1s ease-out 0.5s 1 normal forwards;

  animation: slide-in 1s ease-out, fade 2s linear;
}

.element:hover {
  animation-play-state: paused;
}
11. CSS Variables (Custom Properties)
Declaring and Using Variables
:root {
  --primary-color: #3498db;
  --secondary-color: #2ecc71;
  --text-color: #333;
  --spacing-unit: 8px;
  --max-width: 1200px;
  --border-radius: 4px;
}

.button {
  background-color: var(--primary-color);
  color: white;
  padding: calc(var(--spacing-unit) * 2) var(--spacing-unit);
  border-radius: var(--border-radius);
}

.container {
  max-width: var(--container-width, 800px);
}
Scope and Inheritance
:root {
  --base-font-size: 16px;
}

.card {
  --card-padding: 15px;
  --card-bg: white;

  padding: var(--card-padding);
  background-color: var(--card-bg);
}

.dark-card {
  --card-bg: #333;
  color: white;
}
Theming Applications
:root {
  --bg-color: #ffffff;
  --text-color: #333333;
  --accent-color: #3498db;
}

[data-theme="dark"] {
  --bg-color: #222222;
  --text-color: #f0f0f0;
  --accent-color: #5dade2;
}

body {
  background-color: var(--bg-color);
  color: var(--text-color);
}

button {
  background-color: var(--accent-color);
}
12. CSS Preprocessors and Modern Workflows
CSS Frameworks Comparison
| Framework | Size | Approach | Learning Curve | Best For |
|---|---|---|---|---|
| Bootstrap | Large | Component-based | Low | Rapid prototyping |
| Tailwind CSS | Small to Large | Utility-first | Medium | Custom designs |
| Bulma | Medium | Component-based | Low | Clean, readable code |
| Foundation | Large | Component-based | Medium | Enterprise applications |
| Materialize | Medium | Material Design | Low | Google-like UI |
13. Advanced Techniques
CSS Shapes and Clipping
.circle {
  width: 200px;
  height: 200px;
  border-radius: 50%;
  background: red;
}

.triangle {
  width: 0;
  height: 0;
  border-left: 50px solid transparent;
  border-right: 50px solid transparent;
  border-bottom: 100px solid blue;
}

.float-circle {
  float: left;
  width: 200px;
  height: 200px;
  shape-outside: circle(50%);
}

.clipped {
  clip-path: polygon(50% 0%, 100% 25%, 100% 75%, 50% 100%, 0% 75%, 0% 25%);
}

.complex-clip {
  clip-path: url(#myClipPath);
}
Multi-column Layouts
.content {
  column-count: 3;

  column-width: 300px;

  column-gap: 40px;

  column-rule: 1px solid #ccc;

  .no-break {
    break-inside: avoid;
  }

  .span-all {
    column-span: all;
  }
}
Filter Effects
| Filter | Description | Example |
|---|---|---|
| grayscale | Converts to grayscale | filter: grayscale(100%); |
| blur | Blurs the element | filter: blur(5px); |
| brightness | Adjusts brightness | filter: brightness(150%); |
| contrast | Adjusts contrast | filter: contrast(200%); |
| hue-rotate | Shifts colors | filter: hue-rotate(90deg); |
| drop-shadow | Adds shadow | filter: drop-shadow(5px 5px 10px black); |
img {
  filter: grayscale(100%);
  filter: blur(5px);
  filter: brightness(150%);
  filter: contrast(200%);
  filter: hue-rotate(90deg);
  filter: invert(100%);
  filter: opacity(50%);
  filter: saturate(200%);
  filter: sepia(100%);

  filter: drop-shadow(5px 5px 10px black);

  filter: contrast(150%) brightness(120%) sepia(30%);
}

.svg-filter {
  filter: url(#myFilter);
}
Masking Techniques
.masked-element {
  mask-image: url("mask.png");
  mask-size: cover;

  mask-image: linear-gradient(to right, transparent, black);

  -webkit-mask-image: url("mask.svg");
  -webkit-mask-size: contain;
  -webkit-mask-position: center;
  -webkit-mask-repeat: no-repeat;

  mask-image: url("mask1.svg"), linear-gradient(to right, transparent, black);
  mask-size: cover, cover;
  mask-position: center, center;
  mask-composite: add;
}
Print Stylesheets
@media print {
  header,
  footer,
  nav,
  .sidebar {
    display: none !important;
  }

  body {
    -webkit-print-color-adjust: exact;
    color-adjust: exact;
    background-color: white;
    color: black;
    margin: 0;
    padding: 15mm;
  }

  h2 {
    break-before: always;
  }

  table {
    break-inside: avoid;
  }

  a {
    color: black;
    text-decoration: none;
  }

  a::after {
    content: " (" attr(href) ")";
    font-size: 90%;
  }

  body {
    font-size: 12pt;
  }

  h1 {
    font-size: 18pt;
  }
}
14. Best Practices and Organization
CSS Naming Conventions
BEM (Block, Element, Modifier)
| Component | Syntax | Example |
|---|---|---|
| Block | .block | .card |
| Element | .block__element | .card__title |
| Modifier | .block--modifier, .block__element--modifier | .card--featured, .card__title--large |
.card {
  background: white;
  border-radius: 4px;
}

.card__title {
  font-size: 1.5em;
  margin-top: 0;
}

.card__image {
  width: 100%;
}

.card__body {
  padding: 15px;
}

.card--featured {
  box-shadow: 0 10px 20px rgba(0, 0, 0, 0.2);
}

.card__title--large {
  font-size: 2em;
}
CSS Architecture (SMACSS)
| Category | Purpose | Prefix | Example |
|---|---|---|---|
| Base | Element defaults | none | body, a |
| Layout | Major layout components | l- | .l-container |
| Module | Reusable components | none | .card, .btn |
| State | States of modules | is- | .is-active |
| Theme | Visual themes | theme- | .theme-dark |
body {
  font-family: Arial, sans-serif;
  line-height: 1.6;
}

a {
  color: #0066cc;
  text-decoration: none;
}

.l-container {
  max-width: 1200px;
  margin: 0 auto;
}

.l-grid {
  display: grid;
  grid-template-columns: repeat(12, 1fr);
  gap: 20px;
}

.btn {
  display: inline-block;
  padding: 10px 15px;
  border-radius: 4px;
  background: #333;
  color: white;
}

.card {
  border: 1px solid #ddd;
  border-radius: 4px;
}

.is-hidden {
  display: none;
}

.is-active {
  background-color: #eee;
  font-weight: bold;
}

.theme-dark {
  background-color: #222;
  color: #eee;
}

.theme-dark .btn {
  background-color: #555;
}
Performance Optimization
| Issue | Bad Practice | Good Practice |
|---|---|---|
| Specificity | body .content #sidebar ul.menu li a.active { } | .menu-link-active { } |
| Expensive Properties | Too many box-shadows, transforms | Use sparingly or with will-change |
| Critical CSS | Loading all CSS at once | Inline critical CSS, defer rest |
Browser Compatibility
.gradient {
  background: -webkit-linear-gradient(left, red, blue);
  background: -moz-linear-gradient(left, red, blue);
  background: -o-linear-gradient(left, red, blue);
  background: linear-gradient(to right, red, blue);
}

.modern-layout {
  display: block;
}

@supports (display: grid) {
  .modern-layout {
    display: grid;
    grid-template-columns: repeat(auto-fill, minmax(200px, 1fr));
  }
}

.button {
  background: linear-gradient(to right, #ff7e5f, #feb47b);
  border-radius: 4px;
  box-shadow: 0 4px 6px rgba(0, 0, 0, 0.1);
  color: white;
}

.no-cssgradients .button {
  background-color: #ff7e5f;
}

.no-borderradius .button {
  border: none;
}
Debugging Techniques
| Technique | Code | Purpose |
|---|---|---|
| Outline All Elements | * { outline: 1px solid red !important; } | View element boundaries |
| Background Highlight | * { background: rgba(255, 0, 0, 0.1) !important; } | See element dimensions |
| Empty Element Warnings | div:empty:before { content: "Empty div"; } | Identify empty containers |
* {
  outline: 1px solid red !important;
}

* {
  background: rgba(255, 0, 0, 0.1) !important;
}

div:empty:before {
  content: "Empty div - add content here";
  color: red;
  font-family: monospace;
  background: #ffcccc;
  display: block;
  padding: 10px;
}

[class*="z-"]:hover:before {
  content: attr(class);
  position: absolute;
  top: 0;
  left: 0;
  background: black;
  color: white;
  font-size: 12px;
  padding: 3px 6px;
  z-index: 9999;
}

* {
  overflow: visible !important;
  border: 1px solid red !important;
}
JavaScript Meetings - IEEE Front-End Development Committee
Welcome to the JavaScript section of our IEEE Front-End Development committee meetings! This folder contains all materials and notes related to JavaScript programming sessions.
Meeting Overview
This JavaScript track covers fundamental to advanced JavaScript concepts, building upon the HTML foundation established in our main meetings. Each session is designed to be interactive and hands-on.
Meeting Sessions
Meeting 1: Introduction to JavaScript
Welcome to the Fun Side of Coding
- What is JavaScript and why it's awesome
- Your first "Hello World" program
- Variables: The magic boxes of programming
- Working with numbers and text
- Understanding JavaScript's role in web development
Meeting 2: JavaScript Fundamentals
- Data types and variables
- Operators and expressions
- Control structures (if/else, loops)
- Functions basics
- Scope and hoisting
Meeting 3: DOM Manipulation
- Document Object Model (DOM)
- Selecting and modifying HTML elements
- Event handling
- Dynamic content creation
- Interactive web pages
Meeting 4: Advanced JavaScript Concepts
- Objects and arrays
- ES6+ features
- Asynchronous JavaScript
- API interactions
- Modern JavaScript development
Learning Objectives
By the end of this JavaScript track, you will be able to:
- Understand JavaScript syntax and core concepts
- Manipulate HTML elements dynamically
- Handle user interactions and events
- Work with data and APIs
- Build interactive web applications
- Debug and troubleshoot JavaScript code
Recommended Resources
Documentation
Practice Platforms
Happy Coding! 🎉
IEEE Front-End Development Committee.
JavaScript First Lecture: Welcome to the Fun Side of Coding
What We'll Learn Today
- What is JavaScript? (And why it's AWESOME!)
- Your first "Hello World" program
- Variables: The magic boxes of programming
- Numbers and text
What is JavaScript?
JavaScript is a high-level, interpreted programming language that brings web pages to life!
JavaScript was created in just 10 days in 1995 by Brendan Eich at Netscape! Despite its name, it has no relation to Java programming language.
Web Technologies Stack:
- HTML = Structure and content (the skeleton)
- CSS = Styling and layout (the appearance)
- JavaScript = Behavior and interactivity (the brain)
Key Characteristics:
- Dynamic Typing: Variables can hold different data types without declaration
- Interpreted Language: Code runs directly without compilation
- Object-Oriented & Functional: Supports multiple programming paradigms
- Event-Driven: Responds to user interactions and system events
Dynamic Typing
loosely typed
Unlike languages like C++ or Java, JavaScript uses dynamic typing:
let myVariable = 42; // Number
console.log(typeof myVariable); // "number"

myVariable = "Hello World"; // Now it's a String
console.log(typeof myVariable); // "string"

myVariable = true; // Now it's a Boolean
console.log(typeof myVariable); // "boolean"
typeof()is a special operator that tells you the type of a variable.
Your First JavaScript Code
// This is your first JavaScript code!
console.log("Hello, World! 🌍");
console.log("Welcome to JavaScript! 🎉");
What just happened?
console.log()is like a megaphone that shouts to the console- Everything inside the quotes
" "is exactly what gets displayed - The
//makes a comment (notes for humans, ignored by computer)
Console Debugging
- Open your browser
- Press
F12(or right-click → Inspect) - Go to "Console" tab
- Type:
console.log("My name is [YOUR NAME]!")
Variables: Data Storage in JavaScript
Variables are containers that store data values. In JavaScript, we have three ways to declare variables, each with different characteristics.
Variable Declaration Keywords
1. let - Modern Block-Scoped Variable
let playerName = "Alex";
let playerScore = 100;

// Can be reassigned
playerScore = 150;
console.log("New score: " + playerScore);
Characteristics of let:
- Block-scoped (limited to { } blocks)
- Can be reassigned
- Cannot be redeclared in same scope
- Temporal Dead Zone (must declare before use)
2. const - Constant Values
const GAME_NAME = "Space Adventure";
const MAX_PLAYERS = 4;
const CONFIG = {
  difficulty: "medium",
  sound: true,
};

// This would cause an error:
// GAME_NAME = "New Game"; // ❌ Cannot reassign const
Characteristics of const:
- Block-scoped
- Cannot be reassigned
- Cannot be redeclared
- Must be initialized when declared
- Objects/arrays can have their contents modified
3. var - Legacy Function-Scoped Variable
var oldStyleVariable = "I'm from the past";
var globalCounter = 0;

// var has function scope, not block scope
function example() {
  var functionScoped = "only accessible in this function";
}
Characteristics of var (Legacy):
- Function-scoped (not block-scoped)
- Can be reassigned and redeclared
- Hoisted (can be used before declaration)
- Can cause unexpected behavior
Best Practices for Variable Declaration
- Use
constby default - for values that won't change - Use
let- when you need to reassign the variable - Avoid
var- it's legacy and can cause issues
// Good practices
const userName = "John Doe"; // Won't change
const userAge = 25; // Won't change
let currentScore = 0; // Will change during game
let isGameActive = true; // Will toggle
Data Types in JavaScript
JavaScript has several built-in data types:
// Primitive Data Types
let numberValue = 42; // Number
let stringValue = "Hello World"; // String
let booleanValue = true; // Boolean
let undefinedValue; // Undefined
let nullValue = null; // Null
let symbolValue = Symbol("id"); // Symbol (ES6)
let bigIntValue = 123n; // BigInt (ES2020)

// Non-Primitive Data Type
let objectValue = {
  // Object
  name: "John",
  age: 30,
};
let arrayValue = [1, 2, 3, 4, 5]; // Array (special object)

// Check data types
console.log(typeof numberValue); // "number"
console.log(typeof stringValue); // "string"
console.log(typeof booleanValue); // "boolean"
console.log(typeof objectValue); // "object"
console.log(typeof arrayValue); // "object" (arrays are objects)
Game Example: Character Creation
// Let's create a game character!
let characterName = "Lightning McQueen";
let characterLevel = 5;
let characterHealth = 100;
let characterPower = "Super Speed";

console.log("Character Created!");
console.log("Name: " + characterName);
console.log("Level: " + characterLevel);
console.log("Health: " + characterHealth + "%");
console.log("Special Power: " + characterPower);
JavaScript Operators
Operators are symbols that perform operations on values and variables. JavaScript provides several categories of operators.
Arithmetic Operators
let a = 10;
let b = 3;

console.log("Addition: " + a + " + " + b + " = " + (a + b)); // 13
console.log("Subtraction: " + a + " - " + b + " = " + (a - b)); // 7
console.log("Multiplication: " + a + " * " + b + " = " + a * b); // 30
console.log("Division: " + a + " / " + b + " = " + a / b); // 3.333...
console.log("Modulus (remainder): " + a + " % " + b + " = " + (a % b)); // 1
console.log("Exponentiation: " + a + " ** " + b + " = " + a ** b); // 1000

// Increment and Decrement
let counter = 5;
console.log("Original counter: " + counter); // 5
console.log("Pre-increment: " + ++counter); // 6 (increment first, then use)
console.log("Post-increment: " + counter++); // 6 (use first, then increment)
console.log("After post-increment: " + counter); // 7
console.log("Pre-decrement: " + --counter); // 6 (decrement first, then use)
console.log("Post-decrement: " + counter--); // 6 (use first, then decrement)
console.log("Final counter: " + counter); // 5
Assignment Operators
let score = 100;

score += 50; // score = score + 50;  → 150
score -= 20; // score = score - 20;  → 130
score *= 2; // score = score * 2;   → 260
score /= 4; // score = score / 4;   → 65
score %= 10; // score = score % 10;  → 5
score **= 2; // score = score ** 2;  → 25

console.log("Final score: " + score); // 25
Comparison Operators
let x = 5;
let y = "5";
let z = 10;

// Equality (loose - type coercion)
console.log(x == y); // true (5 == "5" → true, converts string to number)
console.log(x == z); // false (5 == 10 → false)

// Strict equality (no type coercion)
console.log(x === y); // false (5 === "5" → false, different types)
console.log(x === 5); // true (same value and type)

// Inequality
console.log(x != y); // false (5 != "5" → false, converts string to number)
console.log(x !== y); // true (5 !== "5" → true, different types)

// Relational operators
console.log(x < z); // true (5 < 10)
console.log(x > z); // false (5 > 10)
console.log(x <= 5); // true (5 <= 5)
console.log(x >= z); // false (5 >= 10)
Logical Operators
let isLoggedIn = true;
let hasPermission = false;
let isAdmin = true;

// AND operator (&&) - all conditions must be true
console.log(isLoggedIn && hasPermission); // false
console.log(isLoggedIn && isAdmin); // true

// OR operator (||) - at least one condition must be true
console.log(isLoggedIn || hasPermission); // true
console.log(hasPermission || false); // false

// NOT operator (!) - inverts the boolean value
console.log(!isLoggedIn); // false
console.log(!hasPermission); // true
console.log(!!isLoggedIn); // true (double negation)
String Operators
let firstName = "John";
let lastName = "Doe";

// Concatenation with +
let fullName = firstName + " " + lastName;
console.log(fullName); // "John Doe"

// Concatenation assignment
let greeting = "Hello, ";
greeting += firstName;
console.log(greeting); // "Hello, John"

// Template literals (ES6) - more powerful string concatenation
let age = 25;
let message = `My name is ${firstName} ${lastName} and I am ${age} years old.`;
console.log(message); // "My name is John Doe and I am 25 years old."
try to do the character creation example with template literals
Ternary (Conditional) Operator
let age = 18;
let canVote = age >= 18 ? "Yes" : "No";
console.log("Can vote: " + canVote); // "Can vote: Yes"

// Multiple conditions
let score = 85;
let grade = score >= 90 ? "A" : score >= 80 ? "B" : score >= 70 ? "C" : "F";
console.log("Grade: " + grade); // "Grade: B"
typeof Operator
console.log(typeof 42); // "number"
console.log(typeof "Hello"); // "string"
console.log(typeof true); // "boolean"
console.log(typeof undefined); // "undefined"
console.log(typeof null); // "object" (this is a known quirk)
console.log(typeof {}); // "object"
console.log(typeof []); // "object"
console.log(typeof function () {}); // "function"
Math Operations with Real Examples
// Shopping cart calculation
const itemPrice = 29.99;
const quantity = 3;
const taxRate = 0.08;

const subtotal = itemPrice * quantity;
const tax = subtotal * taxRate;
const total = subtotal + tax;

console.log("Item price: $" + itemPrice.toFixed(2));
console.log("Quantity: " + quantity);
console.log("Subtotal: $" + subtotal.toFixed(2));
console.log("Tax (8%): $" + tax.toFixed(2));
console.log("Total: $" + total.toFixed(2));

// Game score calculation
let baseScore = 1000;
let timeBonus = 500;
let accuracyMultiplier = 1.5;
let penalties = 200;

let finalScore = (baseScore + timeBonus) * accuracyMultiplier - penalties;
console.log("Final game score: " + Math.round(finalScore));

// Temperature conversion
let celsius = 25;
let fahrenheit = (celsius * 9) / 5 + 32;
let kelvin = celsius + 273.15;

console.log(celsius + "°C = " + fahrenheit + "°F = " + kelvin + "K");
Working with Text (Strings)
Text in programming is called "strings" (like a string of letters!)
let firstName = "John";
let lastName = "Doe";
let fullName = firstName + " " + lastName;

console.log("First name: " + firstName);
console.log("Last name: " + lastName);
console.log("Full name: " + fullName);

// Fun with strings!
let message = "JavaScript";
let exclamation = "is awesome!";
let fullMessage = message + " " + exclamation + " 🎉";

console.log(fullMessage);
String Magic Tricks
let word = "JavaScript";

console.log("Length of the word: " + word.length);
console.log("In UPPERCASE: " + word.toUpperCase());
console.log("in lowercase: " + word.toLowerCase());
Mini Project: Personal Introduction
Let's combine everything we learned to create a personal introduction!
// Your personal info
let name = "Put your name here";
let age = 20; // Your age
let hobby = "Your favorite hobby";
let favoriteFood = "Your favorite food";
let dreamJob = "Your dream job";

// Create introduction
console.log(`🌟 Meet ${name}!`);
console.log(`📅 Age: ${age} years old`);
console.log(`🎨 Hobby: ${hobby}`);
console.log(`🍕 Favorite food: ${favoriteFood}`);
console.log(`💼 Dream job: ${dreamJob}`);
console.log(`🚀 Currently learning: JavaScript!`);

console.log(`Meet ${name}, a ${age}-year-old who loves ${hobby} and enjoys ${favoriteFood}. Their dream job is to become a ${dreamJob}.`);

// Calculate something fun
let yearsToGraduate = 4;
let graduationYear = 2025 + yearsToGraduate;
console.log(`🎓 Will graduate in: ${graduationYear}`);
Practice Challenges
Challenge 1: Advanced Calculator
Create a comprehensive calculator using all operators:
let num1 = 15;
let num2 = 4;

// Arithmetic operations
console.log("=== ARITHMETIC OPERATIONS ===");
console.log(`${num1} + ${num2} = ${num1 + num2}`);
console.log(`${num1} - ${num2} = ${num1 - num2}`);
console.log(`${num1} * ${num2} = ${num1 * num2}`);
console.log(`${num1} / ${num2} = ${num1 / num2}`);
console.log(`${num1} % ${num2} = ${num1 % num2}`);
console.log(`${num1} ** ${num2} = ${num1 ** num2}`);

// Comparison operations
console.log("=== COMPARISON OPERATIONS ===");
console.log(`${num1} == ${num2}: ${num1 == num2}`);
console.log(`${num1} === ${num2}: ${num1 === num2}`);
console.log(`${num1} > ${num2}: ${num1 > num2}`);
console.log(`${num1} < ${num2}: ${num1 < num2}`);
Remember This
"Programming is not about what you know; it's about what you can figure out. Master the fundamentals, and complex problems become manageable." 🌟
Task (Essential Practice)
You are creating a program that calculate and show the citizen if he can vote or not based on his birth year.
const name = "Ahmed";
const birthYear = 2004;
- The citizen can vote if his age is greater than or equal to 18.
- display a message like "Ahmed can vote! your age is 21" or "Ahmed cannot vote yet. you can vote 2 years latter" based on the age.
- hint
const currentYear = new Date().getFullYear();to get the current year. - Hint user ternary operator to display the message.
JavaScript Second Lecture: Control Flow and Functions
What We'll Learn Today
- Control structures: Making decisions with if/else
- Loops: Repeating actions efficiently
- Functions: Building reusable code blocks
- Arrays: Storing multiple values
- Problem-solving with real examples
Control Structures: Making Decisions
Control structures allow your program to make decisions and execute different code based on conditions.
If Statements
The if statement executes code only when a condition is true:
let temperature = 25;

if (temperature > 20) {
    console.log("It's a warm day! 🌞");
}

// With else
let age = 17;

if (age >= 18) {
    console.log("You can vote! 🗳️");
} else {
    console.log("You're not old enough to vote yet.");
}
If-Else If-Else Chain
Handle multiple conditions with else if:
let grade = 85;

if (grade >= 90) {
    console.log("Excellent! Grade: A 🌟");
} else if (grade >= 80) {
    console.log("Great job! Grade: B 👍");
} else if (grade >= 70) {
    console.log("Good work! Grade: C 👌");
} else if (grade >= 60) {
    console.log("You passed! Grade: D 📝");
} else {
    console.log("Need improvement. Grade: F 📚");
}
Switch Statements
When you have many conditions based on a single value:
let dayOfWeek = 3;
let dayName;

switch (dayOfWeek) {
    case 1:
        dayName = "Monday";
        break;
    case 2:
        dayName = "Tuesday";
        break;
    case 3:
        dayName = "Wednesday";
        break;
    case 4:
        dayName = "Thursday";
        break;
    case 5:
        dayName = "Friday";
        break;
    case 6:
        dayName = "Saturday";
        break;
    case 7:
        dayName = "Sunday";
        break;
    default:
        dayName = "Invalid day";
}

console.log(`Today is ${dayName}`);
Game Example: Player Status Checker
const playerName = "Alex";
const playerLevel = 15;
const playerHealth = 75;
const hasSpecialWeapon = true;

console.log(`=== ${playerName}'s Status ===`);

// Check player level
if (playerLevel >= 20) {
    console.log("🏆 Expert Player!");
} else if (playerLevel >= 10) {
    console.log("⭐ Intermediate Player");
} else {
    console.log("🌱 Beginner Player");
}

// Check health status
if (playerHealth > 80) {
    console.log("💚 Health: Excellent");
} else if (playerHealth > 50) {
    console.log("💛 Health: Good");
} else if (playerHealth > 20) {
    console.log("🧡 Health: Low - Find health pack!");
} else {
    console.log("❤️ Health: Critical - Danger!");
}

// Check equipment
if (hasSpecialWeapon && playerLevel >= 10) {
    console.log("⚔️ Ready for boss battle!");
} else if (hasSpecialWeapon) {
    console.log("🗡️ You have a special weapon, but need more experience");
} else {
    console.log("🔨 Find better weapons to improve your chances");
}
Loops: Repeating Actions
Loops allow you to execute code multiple times without writing it repeatedly.
For Loop
Perfect when you know how many times to repeat:
// Basic for loop
console.log("Counting to 5:");
for (let i = 1; i <= 5; i++) {
    console.log(`Count: ${i}`);
}

// Loop with different step
console.log("\nEven numbers from 2 to 10:");
for (let i = 2; i <= 10; i += 2) {
    console.log(i);
}

// Countdown
console.log("\nRocket launch countdown:");
for (let i = 10; i >= 1; i--) {
    console.log(`${i}...`);
}
console.log("🚀 Blast off!");
While Loop
Continues while a condition is true:
let password = "";
let attempts = 0;
const maxAttempts = 3;

// Simulate password attempts
while (password !== "secret123" && attempts < maxAttempts) {
    attempts++;
    console.log(`Attempt ${attempts}: Enter password`);

    // Simulate different password attempts
    if (attempts === 1) password = "wrong1";
    else if (attempts === 2) password = "wrong2";
    else password = "secret123";

    if (password === "secret123") {
        console.log("✅ Access granted!");
    } else if (attempts < maxAttempts) {
        console.log("❌ Wrong password, try again");
    }
}

if (attempts >= maxAttempts && password !== "secret123") {
    console.log("🔒 Account locked! Too many failed attempts");
}
Do-While Loop
Executes at least once, then checks condition:
let userChoice;

do {
    console.log("\n=== Game Menu ===");
    console.log("1. Start Game");
    console.log("2. View Scores");
    console.log("3. Exit");

    // Simulate user input
    userChoice = Math.floor(Math.random() * 4) + 1; // Random choice 1-4
    console.log(`You chose: ${userChoice}`);

    switch (userChoice) {
        case 1:
            console.log("🎮 Starting new game...");
            break;
        case 2:
            console.log("📊 Displaying high scores...");
            break;
        case 3:
            console.log("👋 Thanks for playing!");
            break;
        default:
            console.log("❓ Invalid choice, please try again");
    }
} while (userChoice !== 3);
Loop Control: Break and Continue
console.log("Finding first number divisible by 7:");
for (let i = 1; i <= 50; i++) {
    if (i % 7 === 0) {
        console.log(`Found it: ${i}`);
        break; // Exit the loop
    }
}

console.log("\nOdd numbers from 1 to 10:");
for (let i = 1; i <= 10; i++) {
    if (i % 2 === 0) {
        continue; // Skip even numbers
    }
    console.log(i);
}
Functions: Building Reusable Code
Functions are reusable blocks of code that perform specific tasks.
Function Declaration
// Basic function
function greetUser() {
    console.log("Hello! Welcome to our website! 👋");
}

// Call the function
greetUser();

// Function with parameters
function greetUserByName(name) {
    console.log(`Hello, ${name}! Welcome to our website! 👋`);
}

greetUserByName("Sarah");
greetUserByName("Ahmed");
Functions with Return Values
// Function that returns a value
function addNumbers(a, b) {
    return a + b;
}

let result = addNumbers(5, 3);
console.log(`5 + 3 = ${result}`);

// Function with multiple parameters and calculations
function calculateArea(length, width) {
    const area = length * width;
    return area;
}

function calculatePerimeter(length, width) {
    const perimeter = 2 * (length + width);
    return perimeter;
}

const roomLength = 12;
const roomWidth = 8;

console.log(`Room dimensions: ${roomLength}m × ${roomWidth}m`);
console.log(`Area: ${calculateArea(roomLength, roomWidth)} square meters`);
console.log(`Perimeter: ${calculatePerimeter(roomLength, roomWidth)} meters`);
Function Expressions and Arrow Functions
// Function expression
const multiply = function(a, b) {
    return a * b;
};

// Arrow function (ES6)
const divide = (a, b) => {
    return a / b;
};

// Short arrow function (for single expressions)
const square = x => x * x;
const double = x => x * 2;

console.log(`multiply(4, 5) = ${multiply(4, 5)}`);
console.log(`divide(20, 4) = ${divide(20, 4)}`);
console.log(`square(6) = ${square(6)}`);
console.log(`double(7) = ${double(7)}`);
Functions with Default Parameters
function createProfile(name, age = 18, country = "Unknown") {
    return `Name: ${name}, Age: ${age}, Country: ${country}`;
}

console.log(createProfile("John"));
console.log(createProfile("Sarah", 25));
console.log(createProfile("Ahmed", 30, "Egypt"));
Real-World Function Examples
// Temperature conversion functions
function celsiusToFahrenheit(celsius) {
    return (celsius * 9/5) + 32;
}

function fahrenheitToCelsius(fahrenheit) {
    return (fahrenheit - 32) * 5/9;
}

// Grade calculator
function calculateGrade(score) {
    if (score >= 90) return "A";
    if (score >= 80) return "B";
    if (score >= 70) return "C";
    if (score >= 60) return "D";
    return "F";
}

// Password strength checker
function checkPasswordStrength(password) {
    let strength = 0;
    let feedback = [];

    if (password.length >= 8) {
        strength += 1;
    } else {
        feedback.push("Use at least 8 characters");
    }

    if (/[A-Z]/.test(password)) {
        strength += 1;
    } else {
        feedback.push("Include uppercase letters");
    }

    if (/[0-9]/.test(password)) {
        strength += 1;
    } else {
        feedback.push("Include numbers");
    }

    if (/[!@#$%^&*]/.test(password)) {
        strength += 1;
    } else {
        feedback.push("Include special characters");
    }

    const strengthLevels = ["Very Weak", "Weak", "Fair", "Good", "Strong"];
    return {
        level: strengthLevels[strength],
        feedback: feedback
    };
}

// Test the functions
console.log("=== Temperature Conversion ===");
console.log(`25°C = ${celsiusToFahrenheit(25)}°F`);
console.log(`77°F = ${fahrenheitToCelsius(77).toFixed(1)}°C`);

console.log("\n=== Grade Calculator ===");
console.log(`Score 95: Grade ${calculateGrade(95)}`);
console.log(`Score 73: Grade ${calculateGrade(73)}`);

console.log("\n=== Password Strength ===");
let passwordTest = checkPasswordStrength("MyPass123!");
console.log(`Strength: ${passwordTest.level}`);
if (passwordTest.feedback.length > 0) {
    console.log("Suggestions:", passwordTest.feedback.join(", "));
}
Arrays: Storing Multiple Values
Arrays allow you to store multiple values in a single variable.
Creating and Accessing Arrays
// Creating arrays
let fruits = ["apple", "banana", "orange", "grape"];
let numbers = [1, 2, 3, 4, 5];
let mixed = ["John", 25, true, "Developer"];

// Accessing array elements (0-indexed)
console.log("First fruit:", fruits[0]);
console.log("Second fruit:", fruits[1]);
console.log("Last fruit:", fruits[fruits.length - 1]);

// Array properties
console.log("Number of fruits:", fruits.length);
console.log("Is array empty?", fruits.length === 0);
Array Methods
let shoppingList = ["milk", "bread", "eggs"];

// Adding elements
shoppingList.push("cheese"); // Add to end
shoppingList.unshift("butter"); // Add to beginning

console.log("Updated list:", shoppingList);

// Removing elements
let lastItem = shoppingList.pop(); // Remove from end
let firstItem = shoppingList.shift(); // Remove from beginning

console.log("Removed:", lastItem, "and", firstItem);
console.log("Final list:", shoppingList);

// Finding elements
let position = shoppingList.indexOf("bread");
console.log("Bread is at position:", position);

let hasEggs = shoppingList.includes("eggs");
console.log("List includes eggs:", hasEggs);
Looping Through Arrays
let students = ["Alice", "Bob", "Charlie", "Diana"];

// For loop
console.log("=== Using for loop ===");
for (let i = 0; i < students.length; i++) {
    console.log(`${i + 1}. ${students[i]}`);
}

// For...of loop (modern way)
console.log("\n=== Using for...of loop ===");
for (let student of students) {
    console.log(`Student: ${student}`);
}

// forEach method
console.log("\n=== Using forEach method ===");
students.forEach(function(student, index) {
    console.log(`${index + 1}. ${student}`);
});

// Arrow function with forEach
students.forEach((student, index) => {
    console.log(`#${index + 1}: ${student}`);
});
Array with Functions
function analyzeScores(scores) {
    let total = 0;
    let highest = scores[0];
    let lowest = scores[0];

    for (let score of scores) {
        total += score;
        if (score > highest) highest = score;
        if (score < lowest) lowest = score;
    }

    return {
        average: total / scores.length,
        highest: highest,
        lowest: lowest,
        total: total
    };
}

let testScores = [85, 92, 78, 96, 87, 91];
let analysis = analyzeScores(testScores);

console.log("=== Score Analysis ===");
console.log(`Scores: ${testScores.join(", ")}`);
console.log(`Average: ${analysis.average.toFixed(1)}`);
console.log(`Highest: ${analysis.highest}`);
console.log(`Lowest: ${analysis.lowest}`);
console.log(`Total: ${analysis.total}`);
Mini Project: Student Grade Manager
Let's combine everything we learned to create a student grade management system!
// Student Grade Manager
let students = [];

// Function to add a student
function addStudent(name, ...grades) {
    const student = {
        name: name,
        grades: grades,
        average: calculateAverage(grades),
        letterGrade: ""
    };

    student.letterGrade = getLetterGrade(student.average);
    students.push(student);

    console.log(`✅ Added ${name} with average ${student.average.toFixed(1)} (${student.letterGrade})`);
}

// Function to calculate average
function calculateAverage(grades) {
    let sum = 0;
    for (let grade of grades) {
        sum += grade;
    }
    return sum / grades.length;
}

// Function to get letter grade
function getLetterGrade(average) {
    if (average >= 90) return "A";
    if (average >= 80) return "B";
    if (average >= 70) return "C";
    if (average >= 60) return "D";
    return "F";
}

// Function to display all students
function displayAllStudents() {
    console.log("\n=== CLASS ROSTER ===");
    if (students.length === 0) {
        console.log("No students enrolled yet.");
        return;
    }

    for (let i = 0; i < students.length; i++) {
        const student = students[i];
        console.log(`${i + 1}. ${student.name}`);
        console.log(`   Grades: ${student.grades.join(", ")}`);
        console.log(`   Average: ${student.average.toFixed(1)} (${student.letterGrade})`);
        console.log("");
    }
}

// Function to find top student
function findTopStudent() {
    if (students.length === 0) return null;

    let topStudent = students[0];
    for (let student of students) {
        if (student.average > topStudent.average) {
            topStudent = student;
        }
    }
    return topStudent;
}

// Function to get class statistics
function getClassStatistics() {
    if (students.length === 0) {
        console.log("No students to analyze.");
        return;
    }

    let totalAverage = 0;
    let gradeCount = { A: 0, B: 0, C: 0, D: 0, F: 0 };

    for (let student of students) {
        totalAverage += student.average;
        gradeCount[student.letterGrade]++;
    }

    console.log("\n=== CLASS STATISTICS ===");
    console.log(`Total Students: ${students.length}`);
    console.log(`Class Average: ${(totalAverage / students.length).toFixed(1)}`);
    console.log("Grade Distribution:");
    for (let grade in gradeCount) {
        console.log(`  ${grade}: ${gradeCount[grade]} students`);
    }

    const topStudent = findTopStudent();
    console.log(`🏆 Top Student: ${topStudent.name} (${topStudent.average.toFixed(1)})`);
}

// Add some students
addStudent("Alice Johnson", 95, 88, 92, 90);
addStudent("Bob Smith", 78, 82, 85, 80);
addStudent("Charlie Brown", 92, 95, 89, 94);
addStudent("Diana Prince", 88, 91, 87, 90);

// Display results
displayAllStudents();
getClassStatistics();
Practice Challenges
Challenge 1: Number Guessing Game
function numberGuessingGame() {
    const secretNumber = Math.floor(Math.random() * 100) + 1;
    let attempts = 0;
    const maxAttempts = 7;

    console.log("🎯 Welcome to the Number Guessing Game!");
    console.log("I'm thinking of a number between 1 and 100");
    console.log(`You have ${maxAttempts} attempts to guess it!`);

    // Simulate guesses for demonstration
    const guesses = [50, 75, 62, 68, 71, 69, 70];

    for (let guess of guesses) {
        attempts++;
        console.log(`\nAttempt ${attempts}: You guessed ${guess}`);

        if (guess === secretNumber) {
            console.log("🎉 Congratulations! You found the number!");
            console.log(`You won in ${attempts} attempts!`);
            break;
        } else if (guess < secretNumber) {
            console.log("📈 Too low! Try a higher number.");
        } else {
            console.log("📉 Too high! Try a lower number.");
        }

        if (attempts >= maxAttempts) {
            console.log(`\n😞 Game over! The number was ${secretNumber}`);
            break;
        }
    }
}

// Run the game
numberGuessingGame();
Challenge 2: Simple Calculator
function calculator(num1, operator, num2) {
    let result;

    switch (operator) {
        case "+":
            result = num1 + num2;
            break;
        case "-":
            result = num1 - num2;
            break;
        case "*":
            result = num1 * num2;
            break;
        case "/":
            if (num2 === 0) {
                return "Error: Cannot divide by zero!";
            }
            result = num1 / num2;
            break;
        case "**":
            result = num1 ** num2;
            break;
        default:
            return "Error: Invalid operator!";
    }

    return `${num1} ${operator} ${num2} = ${result}`;
}

// Test the calculator
console.log("=== CALCULATOR TESTS ===");
console.log(calculator(10, "+", 5));
console.log(calculator(10, "-", 3));
console.log(calculator(6, "*", 4));
console.log(calculator(15, "/", 3));
console.log(calculator(2, "**", 8));
console.log(calculator(10, "/", 0));
console.log(calculator(5, "%", 2));
Remember This
"Functions are the building blocks of larger programs. Master them, and you'll be able to solve complex problems by breaking them into smaller, manageable pieces." 🧩
Task (Essential Practice)
Create a Personal Budget Tracker that includes:
- Variables for monthly income and expenses
- Functions to calculate budget summary
- Arrays to store expense categories and amounts
- Control structures to provide budget advice
- Loops to process all expenses
// Starter code - complete this program
const monthlyIncome = 3000;

// Two separate arrays for expense categories and amounts
const expenseCategories = ["Rent", "Food", "Transportation", "Utilities", "Entertainment"];
const expenseAmounts = [1200, 400, 200, 150, 300];

// TODO: Create functions to:
// 1. Calculate total expenses using a loop
// 2. Calculate remaining budget (income - total expenses)
// 3. Find the highest expense category and amount
// 4. Provide budget advice based on remaining money
// 5. Display a complete budget report

// Your solution here...
Requirements:
- Use a loop to calculate total expenses from the expenseAmounts array
- Use if-else statements to provide different advice based on budget status
- Use functions to organize your code
- Display results in a user-friendly format with category names and amounts
- Handle the case where expenses exceed income
Bonus: Add a function that suggests which expense category to reduce if the budget is negative!
JavaScript Third Lecture: Objects, DOM Manipulation, and Events
What We'll Learn Today
- Objects: Storing related data together
- DOM Manipulation: Making web pages interactive
- Event Handling: Responding to user actions
- Local Storage: Remembering user data
- Building a complete interactive web application
Objects: Organizing Related Data
Objects are collections of related properties and methods. They help us organize data that belongs together.
Creating Objects
// Object literal notation
let student = {
    name: "Sarah",
    age: 20,
    major: "Computer Science",
    gpa: 3.8,
    isEnrolled: true
};

// Accessing object properties
console.log("Student name: " + student.name);
console.log("Student age: " + student.age);
console.log("GPA: " + student.gpa);

// Dot notation vs bracket notation
console.log(student.major);        // Dot notation
console.log(student["major"]);     // Bracket notation (useful for dynamic properties)
Adding and Modifying Properties
let car = {
    brand: "Toyota",
    model: "Camry",
    year: 2022
};

// Adding new properties
car.color = "blue";
car.mileage = 15000;

// Modifying existing properties
car.year = 2023;
car.mileage += 5000;

console.log("=== Car Information ===");
console.log(`Brand: ${car.brand}`);
console.log(`Model: ${car.model}`);
console.log(`Year: ${car.year}`);
console.log(`Color: ${car.color}`);
console.log(`Mileage: ${car.mileage} miles`);
Objects with Methods
let calculator = {
    // Properties
    brand: "Scientific Calculator",
    version: "1.0",

    // Methods (functions inside objects)
    add: function(a, b) {
        return a + b;
    },

    subtract: function(a, b) {
        return a - b;
    },

    multiply: function(a, b) {
        return a * b;
    },

    divide: function(a, b) {
        if (b === 0) {
            return "Error: Cannot divide by zero!";
        }
        return a / b;
    },

    // Method using arrow function
    power: (a, b) => {
        return Math.pow(a, b);
    }
};

// Using object methods
console.log("=== Calculator Tests ===");
console.log(`5 + 3 = ${calculator.add(5, 3)}`);
console.log(`10 - 4 = ${calculator.subtract(10, 4)}`);
console.log(`6 * 7 = ${calculator.multiply(6, 7)}`);
console.log(`15 / 3 = ${calculator.divide(15, 3)}`);
console.log(`2^8 = ${calculator.power(2, 8)}`);
Real-World Object Examples
// Game player object
let player = {
    username: "GamerPro123",
    level: 15,
    health: 100,
    score: 2500,
    inventory: ["sword", "shield", "potion"],

    // Method to take damage
    takeDamage: function(damage) {
        this.health -= damage;
        if (this.health < 0) this.health = 0;
        console.log(`${this.username} took ${damage} damage. Health: ${this.health}`);
    },

    // Method to gain experience
    gainExp: function(exp) {
        this.score += exp;
        console.log(`${this.username} gained ${exp} experience. Total score: ${this.score}`);
    },

    // Method to add item to inventory
    addItem: function(item) {
        this.inventory.push(item);
        console.log(`${this.username} found ${item}! Inventory: ${this.inventory.join(", ")}`);
    }
};

// Using player methods
player.takeDamage(25);
player.gainExp(100);
player.addItem("magic ring");

// Bank account object
let bankAccount = {
    accountNumber: "12345678",
    ownerName: "John Smith",
    balance: 1000.00,
    accountType: "Checking",

    deposit: function(amount) {
        if (amount > 0) {
            this.balance += amount;
            console.log(`✅ Deposited $${amount}. New balance: $${this.balance.toFixed(2)}`);
        } else {
            console.log("❌ Invalid deposit amount");
        }
    },

    withdraw: function(amount) {
        if (amount > 0 && amount <= this.balance) {
            this.balance -= amount;
            console.log(`✅ Withdrew $${amount}. New balance: $${this.balance.toFixed(2)}`);
        } else if (amount > this.balance) {
            console.log("❌ Insufficient funds");
        } else {
            console.log("❌ Invalid withdrawal amount");
        }
    },

    checkBalance: function() {
        console.log(`💰 Account balance: $${this.balance.toFixed(2)}`);
        return this.balance;
    }
};

// Banking operations
console.log("\n=== Banking Operations ===");
bankAccount.checkBalance();
bankAccount.deposit(250);
bankAccount.withdraw(100);
bankAccount.withdraw(2000); // Should fail
DOM Manipulation: Making Web Pages Interactive
The Document Object Model (DOM) allows JavaScript to interact with HTML elements.
Selecting HTML Elements
// HTML structure we're working with:
/*
<div id="container">
    <h1 id="title">Welcome to My Website</h1>
    <p class="description">This is a paragraph</p>
    <button id="changeButton">Click Me!</button>
    <ul id="itemList">
        <li>Item 1</li>
        <li>Item 2</li>
    </ul>
</div>
*/

// Selecting elements by ID
let title = document.getElementById("title");
let button = document.getElementById("changeButton");
let container = document.getElementById("container");

// Selecting elements by class name
let description = document.getElementsByClassName("description")[0];

// Selecting elements by tag name
let paragraphs = document.getElementsByTagName("p");

// Modern selectors (recommended)
let titleModern = document.querySelector("#title");           // ID selector
let descModern = document.querySelector(".description");     // Class selector
let firstLi = document.querySelector("li");                  // First li element
let allLis = document.querySelectorAll("li");               // All li elements

console.log("Title element:", title);
console.log("All list items:", allLis);
Changing Content and Styles
// Changing text content
title.textContent = "Welcome to JavaScript DOM!";

// Changing HTML content
description.innerHTML = "<strong>This text is now bold!</strong>";

// Changing styles
title.style.color = "blue";
title.style.fontSize = "36px";
title.style.textAlign = "center";

// Adding CSS classes
description.classList.add("highlight");
description.classList.add("important");

// Removing CSS classes
description.classList.remove("old-style");

// Toggling CSS classes
button.classList.toggle("active");

// Changing attributes
button.setAttribute("disabled", "true");
button.removeAttribute("disabled");

// Working with form inputs
/*
<input type="text" id="nameInput" placeholder="Enter your name">
<input type="number" id="ageInput" placeholder="Enter your age">
*/

let nameInput = document.querySelector("#nameInput");
let ageInput = document.querySelector("#ageInput");

// Getting input values
let userName = nameInput.value;
let userAge = parseInt(ageInput.value);

// Setting input values
nameInput.value = "John Doe";
ageInput.value = 25;
Creating and Adding Elements
// Creating new elements
let newParagraph = document.createElement("p");
newParagraph.textContent = "This paragraph was created with JavaScript!";
newParagraph.style.color = "green";

// Adding elements to the page
container.appendChild(newParagraph);

// Creating a list item and adding to existing list
let itemList = document.querySelector("#itemList");
let newItem = document.createElement("li");
newItem.textContent = "Item 3 (Added by JavaScript)";
itemList.appendChild(newItem);

// Creating a more complex element
let infoDiv = document.createElement("div");
infoDiv.innerHTML = `
    <h3>Dynamic Content</h3>
    <p>This entire section was created with JavaScript!</p>
    <button onclick="alert('Hello from dynamic button!')">Dynamic Button</button>
`;
infoDiv.style.border = "2px solid #333";
infoDiv.style.padding = "10px";
infoDiv.style.margin = "10px 0";

container.appendChild(infoDiv);
Event Handling: Responding to User Actions
Events allow your JavaScript to respond to user interactions like clicks, key presses, and form submissions.
Basic Event Handling
// Method 1: Using onclick property
let clickButton = document.querySelector("#changeButton");
clickButton.onclick = function() {
    alert("Button was clicked!");
};

// Method 2: Using addEventListener (recommended)
clickButton.addEventListener("click", function() {
    console.log("Button clicked with addEventListener!");
});

// Method 3: Arrow function with addEventListener
clickButton.addEventListener("click", () => {
    title.style.color = title.style.color === "red" ? "blue" : "red";
});
Different Types of Events
// Click events
button.addEventListener("click", function() {
    console.log("Button clicked!");
});

// Mouse events
button.addEventListener("mouseenter", function() {
    button.style.backgroundColor = "lightblue";
});

button.addEventListener("mouseleave", function() {
    button.style.backgroundColor = "";
});

// Keyboard events
let textInput = document.querySelector("#nameInput");

textInput.addEventListener("keydown", function(event) {
    console.log("Key pressed:", event.key);
});

textInput.addEventListener("keyup", function(event) {
    let inputValue = event.target.value;
    console.log("Current input:", inputValue);
});

// Form events
let form = document.querySelector("#userForm");

form.addEventListener("submit", function(event) {
    event.preventDefault(); // Prevent page refresh

    let name = nameInput.value;
    let age = ageInput.value;

    if (name === "" || age === "") {
        alert("Please fill in all fields!");
        return;
    }

    console.log(`Form submitted - Name: ${name}, Age: ${age}`);
});

// Window events
window.addEventListener("load", function() {
    console.log("Page fully loaded!");
});

window.addEventListener("resize", function() {
    console.log("Window resized to:", window.innerWidth, "x", window.innerHeight);
});
Interactive Examples
// Color changer
let colorButtons = document.querySelectorAll(".color-btn");
let colorBox = document.querySelector("#colorBox");

colorButtons.forEach(function(button) {
    button.addEventListener("click", function() {
        let color = button.dataset.color; // Get data-color attribute
        colorBox.style.backgroundColor = color;
        colorBox.textContent = `Color: ${color}`;
    });
});

// Counter application
let counter = 0;
let counterDisplay = document.querySelector("#counterDisplay");
let incrementBtn = document.querySelector("#incrementBtn");
let decrementBtn = document.querySelector("#decrementBtn");
let resetBtn = document.querySelector("#resetBtn");

function updateDisplay() {
    counterDisplay.textContent = counter;
    counterDisplay.style.color = counter > 0 ? "green" : counter < 0 ? "red" : "black";
}

incrementBtn.addEventListener("click", function() {
    counter++;
    updateDisplay();
});

decrementBtn.addEventListener("click", function() {
    counter--;
    updateDisplay();
});

resetBtn.addEventListener("click", function() {
    counter = 0;
    updateDisplay();
});

// Initialize display
updateDisplay();
Local Storage: Remembering User Data
Local Storage allows you to save data in the user's browser that persists between sessions.
Basic Local Storage Operations
// Saving data to local storage
localStorage.setItem("userName", "John Doe");
localStorage.setItem("userAge", "25");
localStorage.setItem("userScore", "1500");

// Getting data from local storage
let savedName = localStorage.getItem("userName");
let savedAge = localStorage.getItem("userAge");
let savedScore = localStorage.getItem("userScore");

console.log("Saved name:", savedName);
console.log("Saved age:", savedAge);
console.log("Saved score:", savedScore);

// Removing specific item
localStorage.removeItem("userAge");

// Clearing all local storage
// localStorage.clear(); // Uncomment to clear all data

// Checking if item exists
if (localStorage.getItem("userName") !== null) {
    console.log("User name is saved");
} else {
    console.log("User name not found");
}
Saving Complex Data
// Saving objects and arrays (convert to JSON)
let userPreferences = {
    theme: "dark",
    language: "English",
    notifications: true,
    volume: 75
};

let favoriteColors = ["blue", "green", "purple"];

// Save object as JSON string
localStorage.setItem("userPreferences", JSON.stringify(userPreferences));
localStorage.setItem("favoriteColors", JSON.stringify(favoriteColors));

// Retrieve and parse JSON data
let savedPreferences = JSON.parse(localStorage.getItem("userPreferences"));
let savedColors = JSON.parse(localStorage.getItem("favoriteColors"));

console.log("Saved preferences:", savedPreferences);
console.log("Saved colors:", savedColors);

// Safe JSON parsing with error handling
function getStoredData(key) {
    try {
        let data = localStorage.getItem(key);
        return data ? JSON.parse(data) : null;
    } catch (error) {
        console.error("Error parsing stored data:", error);
        return null;
    }
}

let preferences = getStoredData("userPreferences");
if (preferences) {
    console.log("Theme:", preferences.theme);
    console.log("Language:", preferences.language);
}
Mini Project: Interactive To-Do List
Let's combine everything we learned to create a complete to-do list application!
// To-Do List Application
let todoApp = {
    tasks: [],

    // Load tasks from local storage
    loadTasks: function() {
        let savedTasks = localStorage.getItem("todoTasks");
        if (savedTasks) {
            this.tasks = JSON.parse(savedTasks);
        }
        this.displayTasks();
    },

    // Save tasks to local storage
    saveTasks: function() {
        localStorage.setItem("todoTasks", JSON.stringify(this.tasks));
    },

    // Add new task
    addTask: function(taskText) {
        if (taskText.trim() === "") {
            alert("Please enter a task!");
            return;
        }

        let newTask = {
            id: Date.now(), // Simple ID generation
            text: taskText,
            completed: false,
            createdAt: new Date().toLocaleDateString()
        };

        this.tasks.push(newTask);
        this.saveTasks();
        this.displayTasks();

        console.log("Task added:", newTask);
    },

    // Remove task
    removeTask: function(taskId) {
        this.tasks = this.tasks.filter(task => task.id !== taskId);
        this.saveTasks();
        this.displayTasks();
        console.log("Task removed:", taskId);
    },

    // Toggle task completion
    toggleTask: function(taskId) {
        let task = this.tasks.find(task => task.id === taskId);
        if (task) {
            task.completed = !task.completed;
            this.saveTasks();
            this.displayTasks();
            console.log("Task toggled:", task);
        }
    },

    // Display all tasks
    displayTasks: function() {
        let taskList = document.querySelector("#taskList");
        let taskCount = document.querySelector("#taskCount");

        // Clear existing tasks
        taskList.innerHTML = "";

        // Display each task
        this.tasks.forEach(task => {
            let taskElement = document.createElement("div");
            taskElement.className = "task-item";
            taskElement.innerHTML = `
                <div class="task-content ${task.completed ? 'completed' : ''}">
                    <input type="checkbox" ${task.completed ? 'checked' : ''}
                           onchange="todoApp.toggleTask(${task.id})">
                    <span class="task-text">${task.text}</span>
                    <span class="task-date">${task.createdAt}</span>
                </div>
                <button class="delete-btn" onclick="todoApp.removeTask(${task.id})">
                    🗑️ Delete
                </button>
            `;

            taskList.appendChild(taskElement);
        });

        // Update task count
        let completedCount = this.tasks.filter(task => task.completed).length;
        taskCount.textContent = `Total: ${this.tasks.length} | Completed: ${completedCount}`;
    },

    // Clear all completed tasks
    clearCompleted: function() {
        this.tasks = this.tasks.filter(task => !task.completed);
        this.saveTasks();
        this.displayTasks();
        console.log("Completed tasks cleared");
    },

    // Get app statistics
    getStats: function() {
        let total = this.tasks.length;
        let completed = this.tasks.filter(task => task.completed).length;
        let pending = total - completed;

        return {
            total: total,
            completed: completed,
            pending: pending,
            completionRate: total > 0 ? Math.round((completed / total) * 100) : 0
        };
    }
};

// Initialize the app when page loads
document.addEventListener("DOMContentLoaded", function() {
    todoApp.loadTasks();

    // Add event listener for form submission
    let addTaskForm = document.querySelector("#addTaskForm");
    let taskInput = document.querySelector("#taskInput");

    addTaskForm.addEventListener("submit", function(event) {
        event.preventDefault();
        todoApp.addTask(taskInput.value);
        taskInput.value = ""; // Clear input
    });

    // Add event listener for clear completed button
    let clearBtn = document.querySelector("#clearCompleted");
    clearBtn.addEventListener("click", function() {
        if (confirm("Are you sure you want to clear all completed tasks?")) {
            todoApp.clearCompleted();
        }
    });

    // Display stats button
    let statsBtn = document.querySelector("#showStats");
    statsBtn.addEventListener("click", function() {
        let stats = todoApp.getStats();
        alert(`📊 Todo List Stats:
Total Tasks: ${stats.total}
Completed: ${stats.completed}
Pending: ${stats.pending}
Completion Rate: ${stats.completionRate}%`);
    });
});

// Keyboard shortcuts
document.addEventListener("keydown", function(event) {
    // Press 'n' to focus on new task input
    if (event.key === 'n' && !event.target.matches('input')) {
        let taskInput = document.querySelector("#taskInput");
        taskInput.focus();
        event.preventDefault();
    }

    // Press 'c' to clear completed tasks
    if (event.key === 'c' && !event.target.matches('input')) {
        todoApp.clearCompleted();
        event.preventDefault();
    }
});
Practice Challenges
Challenge 1: Interactive Quiz App
let quizApp = {
    questions: [
        {
            question: "What does JavaScript stand for?",
            options: ["Java Script", "Just Script", "JavaScript", "None of the above"],
            correct: 2
        },
        {
            question: "Which symbol is used for comments in JavaScript?",
            options: ["//", "/*", "#", "Both A and B"],
            correct: 3
        },
        {
            question: "What is the correct way to declare a variable?",
            options: ["var x;", "let x;", "const x = 5;", "All of the above"],
            correct: 3
        }
    ],

    currentQuestion: 0,
    score: 0,

    startQuiz: function() {
        this.currentQuestion = 0;
        this.score = 0;
        this.displayQuestion();
    },

    displayQuestion: function() {
        if (this.currentQuestion >= this.questions.length) {
            this.showResults();
            return;
        }

        let question = this.questions[this.currentQuestion];
        let quizContainer = document.querySelector("#quizContainer");

        quizContainer.innerHTML = `
            <h3>Question ${this.currentQuestion + 1} of ${this.questions.length}</h3>
            <p class="question-text">${question.question}</p>
            <div class="options">
                ${question.options.map((option, index) => `
                    <button class="option-btn" onclick="quizApp.selectAnswer(${index})">
                        ${option}
                    </button>
                `).join('')}
            </div>
            <p class="score">Score: ${this.score}/${this.questions.length}</p>
        `;
    },

    selectAnswer: function(selectedIndex) {
        let question = this.questions[this.currentQuestion];

        if (selectedIndex === question.correct) {
            this.score++;
            alert("Correct! 🎉");
        } else {
            alert(`Wrong! The correct answer was: ${question.options[question.correct]}`);
        }

        this.currentQuestion++;
        this.displayQuestion();
    },

    showResults: function() {
        let percentage = Math.round((this.score / this.questions.length) * 100);
        let quizContainer = document.querySelector("#quizContainer");

        let grade = percentage >= 80 ? "Excellent!" :
                   percentage >= 60 ? "Good!" :
                   percentage >= 40 ? "Fair" : "Need more practice";

        quizContainer.innerHTML = `
            <h2>Quiz Complete! 🏆</h2>
            <p>Your Score: ${this.score}/${this.questions.length} (${percentage}%)</p>
            <p>Grade: ${grade}</p>
            <button onclick="quizApp.startQuiz()">Take Quiz Again</button>
        `;

        // Save high score
        let highScore = localStorage.getItem("quizHighScore") || 0;
        if (this.score > highScore) {
            localStorage.setItem("quizHighScore", this.score);
            alert("New high score! 🌟");
        }
    }
};
Remember This
"The DOM is your canvas, events are your brushes, and JavaScript is your paint. With these tools, you can create any interactive experience you can imagine!" 🎨
Task (Essential Practice)
Create a Personal Expense Tracker that includes:
- Objects to store expense data
- DOM manipulation to update the interface
- Event handling for user interactions
- Local storage to persist data
- Dynamic content creation
<!-- HTML structure (add this to your HTML file) -->
<div id="expenseTracker">
    <h2>💰 Personal Expense Tracker</h2>

    <form id="expenseForm">
        <input type="text" id="expenseDescription" placeholder="Expense description" required>
        <input type="number" id="expenseAmount" placeholder="Amount ($)" required step="0.01">
        <select id="expenseCategory">
            <option value="food">🍕 Food</option>
            <option value="transport">🚗 Transportation</option>
            <option value="entertainment">🎬 Entertainment</option>
            <option value="utilities">⚡ Utilities</option>
            <option value="other">📦 Other</option>
        </select>
        <button type="submit">Add Expense</button>
    </form>

    <div id="expenseSummary"></div>
    <div id="expenseList"></div>
    <button id="clearAll">Clear All Expenses</button>
</div>
// Starter code - complete this program
let expenseTracker = {
    expenses: [],

    // TODO: Complete these methods
    addExpense: function(description, amount, category) {
        // Create expense object with id, description, amount, category, date
        // Add to expenses array
        // Save to localStorage
        // Update display
    },

    removeExpense: function(expenseId) {
        // Remove expense from array by id
        // Save to localStorage
        // Update display
    },

    displayExpenses: function() {
        // Show all expenses in the expenseList div
        // Each expense should have description, amount, category, date, and delete button
    },

    calculateSummary: function() {
        // Calculate total expenses
        // Calculate expenses by category
        // Display in expenseSummary div
    },

    loadExpenses: function() {
        // Load expenses from localStorage
        // Update display
    },

    saveExpenses: function() {
        // Save expenses array to localStorage as JSON
    }
};

// TODO: Add event listeners for:
// 1. Form submission to add new expense
// 2. Clear all button
// 3. Page load to initialize the app
Requirements:
- Use objects to structure expense data (id, description, amount, category, date)
- Use DOM manipulation to create and update expense list dynamically
- Use event handling for form submission and delete buttons
- Use local storage to persist expenses between browser sessions
- Display summary statistics (total spent, spending by category)
- Add proper form validation
Bonus Features:
- Add expense editing functionality
- Implement expense filtering by category
- Add date range filtering
- Create visual indicators for high spending categories!
JavaScript Fourth Lecture: APIs, Async Programming, and Modern Features
What We'll Learn Today
- Working with APIs: Fetching data from the internet
- Asynchronous Programming: Promises and async/await
- Modern JavaScript: ES6+ features and best practices
- Error Handling: Managing errors gracefully
- Building a weather app with real API data
Introduction to APIs
API (Application Programming Interface) allows different applications to communicate with each other. We'll learn how to fetch data from web APIs.
What is an API?
// API is like a waiter in a restaurant
// You (JavaScript) -> Waiter (API) -> Kitchen (Server) -> Data (Food)

// Example: Weather API
// Your app -> Weather API -> Weather Server -> Weather Data

// Common API examples:
// - Weather data (OpenWeatherMap)
// - User information (GitHub API)
// - Random jokes (JokesAPI)
// - Currency rates (ExchangeRate API)
// - Movie information (OMDB API)
Understanding JSON
JSON (JavaScript Object Notation) is the standard format for API data:
// JSON looks like JavaScript objects but everything is in strings
let jsonString = `{
    "name": "John Doe",
    "age": 30,
    "city": "New York",
    "hobbies": ["reading", "gaming", "coding"],
    "isStudent": false
}`;

// Converting JSON string to JavaScript object
let userData = JSON.parse(jsonString);
console.log("Name:", userData.name);
console.log("Hobbies:", userData.hobbies);

// Converting JavaScript object to JSON string
let person = {
    name: "Sarah",
    age: 25,
    profession: "Developer"
};

let jsonData = JSON.stringify(person);
console.log("JSON string:", jsonData);

// Real API response example
let weatherResponse = {
    "location": "Cairo",
    "temperature": 28,
    "description": "Sunny",
    "humidity": 65,
    "windSpeed": 12
};

console.log(`Weather in ${weatherResponse.location}:`);
console.log(`Temperature: ${weatherResponse.temperature}°C`);
console.log(`Conditions: ${weatherResponse.description}`);
Asynchronous Programming
JavaScript can perform tasks without blocking the main thread. This is crucial for API calls and user experience.
Understanding Synchronous vs Asynchronous
// Synchronous code (blocking)
console.log("Start");
console.log("Middle");
console.log("End");

// Output: Start, Middle, End (in order)

// Asynchronous code (non-blocking)
console.log("Start");

setTimeout(function() {
    console.log("This runs after 2 seconds");
}, 2000);

console.log("End");

// Output: Start, End, "This runs after 2 seconds"
Callbacks
The traditional way to handle asynchronous operations:
// Callback example
function fetchUserData(userId, callback) {
    console.log("Fetching user data...");

    // Simulate API delay
    setTimeout(function() {
        let userData = {
            id: userId,
            name: "Alice Johnson",
            email: "alice@example.com"
        };

        callback(userData);
    }, 1000);
}

function displayUser(user) {
    console.log("User loaded:");
    console.log(`Name: ${user.name}`);
    console.log(`Email: ${user.email}`);
}

// Using the callback
fetchUserData(123, displayUser);

// Callback hell example (avoid this!)
function getUser(userId, callback) {
    setTimeout(() => {
        callback({ id: userId, name: "John" });
    }, 1000);
}

function getPosts(userId, callback) {
    setTimeout(() => {
        callback([{ title: "Post 1" }, { title: "Post 2" }]);
    }, 1000);
}

function getComments(postId, callback) {
    setTimeout(() => {
        callback([{ text: "Great post!" }, { text: "Thanks!" }]);
    }, 1000);
}

// This creates "callback hell" - hard to read and maintain
getUser(1, function(user) {
    getPosts(user.id, function(posts) {
        getComments(posts[0].id, function(comments) {
            console.log("Finally got all data!");
            // Deeply nested callbacks are hard to manage
        });
    });
});
Promises: A Better Way
Promises provide a cleaner way to handle asynchronous operations:
// Creating a promise
function fetchWeatherData(city) {
    return new Promise(function(resolve, reject) {
        console.log(`Fetching weather for ${city}...`);

        // Simulate API call
        setTimeout(function() {
            if (city === "InvalidCity") {
                reject(new Error("City not found!"));
            } else {
                let weatherData = {
                    city: city,
                    temperature: Math.round(Math.random() * 30 + 10),
                    condition: "Sunny",
                    humidity: Math.round(Math.random() * 50 + 30)
                };
                resolve(weatherData);
            }
        }, 1500);
    });
}

// Using promises with .then() and .catch()
fetchWeatherData("Cairo")
    .then(function(weather) {
        console.log("Weather data received:");
        console.log(`${weather.city}: ${weather.temperature}°C, ${weather.condition}`);
        console.log(`Humidity: ${weather.humidity}%`);
    })
    .catch(function(error) {
        console.error("Error:", error.message);
    });

// Chaining promises
fetchWeatherData("Alexandria")
    .then(function(weather) {
        console.log(`Temperature in ${weather.city}: ${weather.temperature}°C`);

        // Return another promise
        return fetchWeatherData("Giza");
    })
    .then(function(weather) {
        console.log(`Temperature in ${weather.city}: ${weather.temperature}°C`);
    })
    .catch(function(error) {
        console.error("Error in chain:", error.message);
    });

// Promise.all - wait for multiple promises
let cities = ["Cairo", "Alexandria", "Giza"];
let weatherPromises = cities.map(city => fetchWeatherData(city));

Promise.all(weatherPromises)
    .then(function(allWeatherData) {
        console.log("All weather data received:");
        allWeatherData.forEach(weather => {
            console.log(`${weather.city}: ${weather.temperature}°C`);
        });
    })
    .catch(function(error) {
        console.error("Error getting all weather data:", error.message);
    });
Async/Await: The Modern Way
Async/await makes asynchronous code look and feel like synchronous code:
// Async function declaration
async function getWeatherInfo(city) {
    try {
        console.log(`Getting weather for ${city}...`);

        // await waits for the promise to resolve
        let weather = await fetchWeatherData(city);

        console.log("Weather information:");
        console.log(`City: ${weather.city}`);
        console.log(`Temperature: ${weather.temperature}°C`);
        console.log(`Condition: ${weather.condition}`);

        return weather;
    } catch (error) {
        console.error("Failed to get weather:", error.message);
        throw error; // Re-throw if needed
    }
}

// Using async function
async function weatherReport() {
    try {
        let cairoWeather = await getWeatherInfo("Cairo");
        let alexWeather = await getWeatherInfo("Alexandria");

        console.log("Weather Report Complete!");
        console.log(`Cairo: ${cairoWeather.temperature}°C`);
        console.log(`Alexandria: ${alexWeather.temperature}°C`);

    } catch (error) {
        console.error("Weather report failed:", error.message);
    }
}

// Run the weather report
weatherReport();

// Parallel async operations
async function getMultipleCitiesWeather() {
    try {
        console.log("Getting weather for multiple cities...");

        // Run all API calls in parallel
        let [cairo, alex, giza] = await Promise.all([
            fetchWeatherData("Cairo"),
            fetchWeatherData("Alexandria"),
            fetchWeatherData("Giza")
        ]);

        console.log("All weather data:");
        console.log(`Cairo: ${cairo.temperature}°C`);
        console.log(`Alexandria: ${alex.temperature}°C`);
        console.log(`Giza: ${giza.temperature}°C`);

    } catch (error) {
        console.error("Error:", error.message);
    }
}

getMultipleCitiesWeather();
Working with Real APIs
Let's work with actual web APIs using the Fetch API:
The Fetch API
// Basic fetch example
async function fetchJoke() {
    try {
        console.log("Fetching a random joke...");

        // Fetch data from API
        let response = await fetch("https://official-joke-api.appspot.com/random_joke");

        // Check if request was successful
        if (!response.ok) {
            throw new Error(`HTTP error! status: ${response.status}`);
        }

        // Parse JSON response
        let joke = await response.json();

        console.log("Here's your joke:");
        console.log(`${joke.setup}`);
        console.log(`${joke.punchline} 😄`);

        return joke;
    } catch (error) {
        console.error("Failed to fetch joke:", error.message);
    }
}

// Get multiple jokes
async function getMultipleJokes(count = 3) {
    try {
        console.log(`Fetching ${count} jokes...`);

        let jokes = [];
        for (let i = 0; i < count; i++) {
            let response = await fetch("https://official-joke-api.appspot.com/random_joke");
            let joke = await response.json();
            jokes.push(joke);
        }

        console.log("Your jokes:");
        jokes.forEach((joke, index) => {
            console.log(`\n${index + 1}. ${joke.setup}`);
            console.log(`   ${joke.punchline} 😄`);
        });

        return jokes;
    } catch (error) {
        console.error("Error fetching jokes:", error.message);
    }
}

// Using the functions
fetchJoke();
getMultipleJokes(5);
Working with Different APIs
// GitHub User API
async function getGitHubUser(username) {
    try {
        let response = await fetch(`https://api.github.com/users/${username}`);

        if (!response.ok) {
            throw new Error("User not found");
        }

        let user = await response.json();

        console.log("GitHub User Info:");
        console.log(`Name: ${user.name || "Not provided"}`);
        console.log(`Username: ${user.login}`);
        console.log(`Public Repos: ${user.public_repos}`);
        console.log(`Followers: ${user.followers}`);
        console.log(`Bio: ${user.bio || "No bio available"}`);

        return user;
    } catch (error) {
        console.error("Error fetching GitHub user:", error.message);
    }
}

// JSONPlaceholder API (for testing)
async function getRandomPost() {
    try {
        let postId = Math.floor(Math.random() * 100) + 1;
        let response = await fetch(`https://jsonplaceholder.typicode.com/posts/${postId}`);
        let post = await response.json();

        console.log("Random Post:");
        console.log(`Title: ${post.title}`);
        console.log(`Body: ${post.body}`);

        // Get user info for this post
        let userResponse = await fetch(`https://jsonplaceholder.typicode.com/users/${post.userId}`);
        let user = await userResponse.json();

        console.log(`Author: ${user.name} (${user.email})`);

        return { post, user };
    } catch (error) {
        console.error("Error fetching post:", error.message);
    }
}

// Currency exchange rates API (example)
async function getCurrencyRate(from, to) {
    try {
        // Note: This is a demo URL - replace with actual API key
        let response = await fetch(`https://api.exchangerate-api.com/v4/latest/${from}`);
        let data = await response.json();

        let rate = data.rates[to];
        if (rate) {
            console.log(`1 ${from} = ${rate} ${to}`);
            return rate;
        } else {
            throw new Error(`Currency ${to} not found`);
        }
    } catch (error) {
        console.error("Error fetching currency rate:", error.message);
    }
}

// Test the functions
getGitHubUser("octocat");
getRandomPost();
getCurrencyRate("USD", "EUR");
Error Handling Best Practices
Proper error handling is crucial for robust applications:
// Different types of errors
async function robustAPICall(url) {
    try {
        // Check if URL is provided
        if (!url) {
            throw new Error("URL is required");
        }

        console.log(`Fetching data from: ${url}`);

        // Set timeout for the request
        let controller = new AbortController();
        let timeoutId = setTimeout(() => controller.abort(), 5000); // 5 second timeout

        let response = await fetch(url, {
            signal: controller.signal
        });

        clearTimeout(timeoutId);

        // Check for HTTP errors
        if (!response.ok) {
            throw new Error(`HTTP ${response.status}: ${response.statusText}`);
        }

        // Check content type
        let contentType = response.headers.get("content-type");
        if (!contentType || !contentType.includes("application/json")) {
            throw new Error("Response is not JSON");
        }

        let data = await response.json();
        console.log("Data fetched successfully:", data);
        return data;

    } catch (error) {
        // Handle different types of errors
        if (error.name === 'AbortError') {
            console.error("Request timed out");
        } else if (error.message.includes('HTTP')) {
            console.error("Server error:", error.message);
        } else if (error.message.includes('JSON')) {
            console.error("Invalid response format:", error.message);
        } else {
            console.error("Unexpected error:", error.message);
        }

        // You could also show user-friendly messages here
        throw error; // Re-throw if the caller needs to handle it
    }
}

// Retry mechanism
async function fetchWithRetry(url, maxRetries = 3) {
    for (let attempt = 1; attempt <= maxRetries; attempt++) {
        try {
            console.log(`Attempt ${attempt}/${maxRetries}`);
            let response = await fetch(url);

            if (!response.ok) {
                throw new Error(`HTTP ${response.status}`);
            }

            let data = await response.json();
            console.log("Success on attempt", attempt);
            return data;

        } catch (error) {
            console.log(`Attempt ${attempt} failed:`, error.message);

            if (attempt === maxRetries) {
                console.error("All attempts failed");
                throw error;
            }

            // Wait before retrying (exponential backoff)
            let delay = Math.pow(2, attempt) * 1000; // 2s, 4s, 8s...
            console.log(`Waiting ${delay}ms before retry...`);
            await new Promise(resolve => setTimeout(resolve, delay));
        }
    }
}
Modern JavaScript Features (ES6+)
Let's explore some powerful modern JavaScript features:
Destructuring
// Array destructuring
let colors = ["red", "green", "blue", "yellow"];
let [primary, secondary, tertiary, ...others] = colors;

console.log("Primary:", primary);        // red
console.log("Secondary:", secondary);    // green
console.log("Others:", others);          // [yellow]

// Object destructuring
let user = {
    id: 1,
    name: "John Doe",
    email: "john@example.com",
    address: {
        city: "Cairo",
        country: "Egypt"
    }
};

let { name, email, address: { city } } = user;
console.log(`${name} lives in ${city}`);

// Destructuring in function parameters
function displayUser({ name, email, age = "Unknown" }) {
    console.log(`Name: ${name}`);
    console.log(`Email: ${email}`);
    console.log(`Age: ${age}`);
}

displayUser({
    name: "Sarah",
    email: "sarah@example.com"
});

// API response destructuring
async function getWeatherInfo(city) {
    try {
        let response = await fetch(`https://api.openweathermap.org/data/2.5/weather?q=${city}`);
        let { main: { temp, humidity }, weather: [{ description }], name } = await response.json();

        console.log(`Weather in ${name}:`);
        console.log(`Temperature: ${temp}°C`);
        console.log(`Humidity: ${humidity}%`);
        console.log(`Description: ${description}`);

    } catch (error) {
        console.error("Weather fetch error:", error.message);
    }
}
Spread and Rest Operators
// Spread operator (...) - expands arrays/objects
let fruits = ["apple", "banana"];
let vegetables = ["carrot", "lettuce"];
let food = [...fruits, ...vegetables, "rice"];

console.log("All food:", food);

// Copying arrays
let originalArray = [1, 2, 3];
let copiedArray = [...originalArray];
let modifiedArray = [...originalArray, 4, 5];

// Object spread
let basicUser = { name: "John", age: 30 };
let fullUser = { ...basicUser, email: "john@example.com", city: "Cairo" };

console.log("Full user:", fullUser);

// Rest operator - collects multiple elements
function sum(...numbers) {
    return numbers.reduce((total, num) => total + num, 0);
}

console.log(sum(1, 2, 3, 4, 5)); // 15

function logUserInfo(name, age, ...hobbies) {
    console.log(`Name: ${name}, Age: ${age}`);
    console.log("Hobbies:", hobbies.join(", "));
}

logUserInfo("Alice", 25, "reading", "gaming", "coding");
Template Literals and Tagged Templates
// Advanced template literals
let user = { name: "Ahmed", score: 95, level: 5 };

let message = `
🎮 Player Stats:
   Name: ${user.name}
   Score: ${user.score.toLocaleString()}
   Level: ${user.level}
   Status: ${user.score > 90 ? "Elite Player! 🏆" : "Keep playing! 💪"}
`;

console.log(message);

// Tagged template literals
function highlight(strings, ...values) {
    return strings.reduce((result, string, i) => {
        let value = values[i] ? `<mark>${values[i]}</mark>` : '';
        return result + string + value;
    }, '');
}

let name = "JavaScript";
let difficulty = "challenging";
let html = highlight`Learning ${name} can be ${difficulty} but rewarding!`;
console.log(html);

// API response formatting
function formatWeather(strings, city, temp, condition) {
    return `
🌤️ Weather Update:
${strings[0]}${city}${strings[1]}${temp}°C${strings[2]}${condition}${strings[3]}
    `.trim();
}

let weatherReport = formatWeather`
Current weather in ${user.city} is ${25} with ${sunny} skies.
Perfect day to go outside! ☀️
`;
Arrow Functions and Advanced Function Features
// Arrow function variations
let add = (a, b) => a + b;
let square = x => x * x;
let greet = () => "Hello World!";
let processUser = user => ({
    ...user,
    displayName: `${user.firstName} ${user.lastName}`,
    initials: `${user.firstName[0]}${user.lastName[0]}`
});

// Higher-order functions with arrays
let numbers = [1, 2, 3, 4, 5, 6, 7, 8, 9, 10];

let evenNumbers = numbers.filter(num => num % 2 === 0);
let squaredNumbers = numbers.map(num => num ** 2);
let sum = numbers.reduce((total, num) => total + num, 0);

console.log("Even numbers:", evenNumbers);
console.log("Squared numbers:", squaredNumbers);
console.log("Sum:", sum);

// Chaining array methods
let result = numbers
    .filter(num => num > 5)        // [6, 7, 8, 9, 10]
    .map(num => num * 2)           // [12, 14, 16, 18, 20]
    .reduce((sum, num) => sum + num, 0); // 80

console.log("Chained result:", result);

// API data processing
async function processUserData() {
    try {
        let response = await fetch('https://jsonplaceholder.typicode.com/users');
        let users = await response.json();

        let processedUsers = users
            .filter(user => user.address.city !== 'undefined')
            .map(user => ({
                id: user.id,
                name: user.name,
                email: user.email,
                city: user.address.city,
                website: user.website
            }))
            .sort((a, b) => a.name.localeCompare(b.name));

        console.log("Processed users:", processedUsers);
        return processedUsers;

    } catch (error) {
        console.error("Error processing user data:", error.message);
    }
}

processUserData();
Mini Project: Weather Dashboard
Let's build a complete weather dashboard combining all our learned concepts:
// Weather Dashboard Application
class WeatherDashboard {
    constructor() {
        this.apiKey = "your-api-key-here"; // Get from OpenWeatherMap
        this.baseUrl = "https://api.openweathermap.org/data/2.5";
        this.cities = JSON.parse(localStorage.getItem('weatherCities')) || ['Cairo', 'Alexandria'];
        this.unit = localStorage.getItem('temperatureUnit') || 'metric';

        this.init();
    }

    async init() {
        console.log("🌤️ Initializing Weather Dashboard...");

        // Load saved cities weather
        await this.loadAllCitiesWeather();

        // Set up auto-refresh every 10 minutes
        setInterval(() => {
            console.log("🔄 Auto-refreshing weather data...");
            this.loadAllCitiesWeather();
        }, 10 * 60 * 1000);

        console.log("✅ Weather Dashboard ready!");
    }

    async getCurrentWeather(city) {
        try {
            let url = `${this.baseUrl}/weather?q=${city}&appid=${this.apiKey}&units=${this.unit}`;
            let response = await fetch(url);

            if (!response.ok) {
                throw new Error(`City "${city}" not found`);
            }

            let data = await response.json();

            return {
                city: data.name,
                country: data.sys.country,
                temperature: Math.round(data.main.temp),
                feelsLike: Math.round(data.main.feels_like),
                humidity: data.main.humidity,
                pressure: data.main.pressure,
                description: data.weather[0].description,
                icon: data.weather[0].icon,
                windSpeed: data.wind.speed,
                visibility: data.visibility / 1000, // Convert to km
                timestamp: new Date().toLocaleString()
            };

        } catch (error) {
            console.error(`Error fetching weather for ${city}:`, error.message);
            throw error;
        }
    }

    async getForecast(city, days = 5) {
        try {
            let url = `${this.baseUrl}/forecast?q=${city}&appid=${this.apiKey}&units=${this.unit}`;
            let response = await fetch(url);

            if (!response.ok) {
                throw new Error(`Forecast for "${city}" not available`);
            }

            let data = await response.json();

            // Process forecast data (API returns data every 3 hours)
            let dailyForecasts = [];
            let currentDate = '';

            data.list.forEach(item => {
                let date = new Date(item.dt * 1000).toDateString();

                if (date !== currentDate && dailyForecasts.length < days) {
                    dailyForecasts.push({
                        date: date,
                        temperature: Math.round(item.main.temp),
                        description: item.weather[0].description,
                        icon: item.weather[0].icon,
                        humidity: item.main.humidity
                    });
                    currentDate = date;
                }
            });

            return dailyForecasts;

        } catch (error) {
            console.error(`Error fetching forecast for ${city}:`, error.message);
            throw error;
        }
    }

    async addCity(cityName) {
        try {
            // Validate city by fetching its weather
            await this.getCurrentWeather(cityName);

            if (!this.cities.includes(cityName)) {
                this.cities.push(cityName);
                this.saveCities();
                console.log(`✅ Added ${cityName} to dashboard`);
                await this.loadAllCitiesWeather();
            } else {
                console.log(`ℹ️ ${cityName} is already in your dashboard`);
            }

        } catch (error) {
            console.error(`❌ Cannot add ${cityName}:`, error.message);
            throw error;
        }
    }

    removeCity(cityName) {
        let index = this.cities.indexOf(cityName);
        if (index > -1) {
            this.cities.splice(index, 1);
            this.saveCities();
            console.log(`🗑️ Removed ${cityName} from dashboard`);
            this.loadAllCitiesWeather();
        }
    }

    async loadAllCitiesWeather() {
        console.log("📡 Loading weather for all cities...");

        try {
            let weatherPromises = this.cities.map(city =>
                this.getCurrentWeather(city).catch(error => ({
                    city: city,
                    error: error.message
                }))
            );

            let results = await Promise.all(weatherPromises);

            console.log("🌤️ Weather Dashboard:");
            console.log("═".repeat(50));

            results.forEach(weather => {
                if (weather.error) {
                    console.log(`❌ ${weather.city}: ${weather.error}`);
                } else {
                    this.displayWeather(weather);
                }
            });

            console.log("═".repeat(50));

        } catch (error) {
            console.error("Error loading weather data:", error.message);
        }
    }

    displayWeather(weather) {
        let unitSymbol = this.unit === 'metric' ? '°C' : '°F';

        console.log(`
🏙️ ${weather.city}, ${weather.country}
🌡️ ${weather.temperature}${unitSymbol} (feels like ${weather.feelsLike}${unitSymbol})
☁️ ${weather.description}
💧 Humidity: ${weather.humidity}%
🌬️ Wind: ${weather.windSpeed} m/s
👁️ Visibility: ${weather.visibility} km
⏰ Updated: ${weather.timestamp}
        `);
    }

    async getDetailedWeatherReport(city) {
        try {
            console.log(`📊 Generating detailed report for ${city}...`);

            let [current, forecast] = await Promise.all([
                this.getCurrentWeather(city),
                this.getForecast(city)
            ]);

            console.log(`\n📋 Detailed Weather Report for ${city}`);
            console.log("═".repeat(60));

            // Current weather
            this.displayWeather(current);

            // 5-day forecast
            console.log("📅 5-Day Forecast:");
            forecast.forEach(day => {
                console.log(`${day.date}: ${day.temperature}°C, ${day.description}`);
            });

            // Weather insights
            this.generateWeatherInsights(current, forecast);

        } catch (error) {
            console.error(`Error generating report for ${city}:`, error.message);
        }
    }

    generateWeatherInsights(current, forecast) {
        console.log("\n💡 Weather Insights:");

        // Temperature analysis
        let temps = forecast.map(day => day.temperature);
        let avgTemp = temps.reduce((sum, temp) => sum + temp, 0) / temps.length;
        let maxTemp = Math.max(...temps);
        let minTemp = Math.min(...temps);

        console.log(`📈 Temperature trend: ${minTemp}°C to ${maxTemp}°C (avg: ${avgTemp.toFixed(1)}°C)`);

        // Humidity analysis
        if (current.humidity > 80) {
            console.log("💧 High humidity - might feel sticky");
        } else if (current.humidity < 30) {
            console.log("🏜️ Low humidity - stay hydrated");
        }

        // Wind analysis
        if (current.windSpeed > 10) {
            console.log("💨 Windy conditions - hold onto your hat!");
        }

        // Clothing recommendations
        if (current.temperature < 15) {
            console.log("🧥 Recommendation: Wear warm clothes");
        } else if (current.temperature > 30) {
            console.log("👕 Recommendation: Light, breathable clothing");
        } else {
            console.log("👔 Recommendation: Comfortable casual wear");
        }
    }

    changeUnit(newUnit) {
        if (newUnit === 'metric' || newUnit === 'imperial') {
            this.unit = newUnit;
            localStorage.setItem('temperatureUnit', newUnit);
            console.log(`🌡️ Changed temperature unit to ${newUnit}`);
            this.loadAllCitiesWeather();
        }
    }

    saveCities() {
        localStorage.setItem('weatherCities', JSON.stringify(this.cities));
    }

    exportData() {
        let data = {
            cities: this.cities,
            unit: this.unit,
            exportDate: new Date().toISOString()
        };

        console.log("📤 Weather Dashboard Export:");
        console.log(JSON.stringify(data, null, 2));
        return data;
    }
}

// Usage examples
async function demonstrateWeatherDashboard() {
    console.log("🚀 Starting Weather Dashboard Demo...");

    // Create dashboard instance
    let dashboard = new WeatherDashboard();

    // Wait for initialization
    await new Promise(resolve => setTimeout(resolve, 2000));

    // Add a new city
    try {
        await dashboard.addCity("London");
        await dashboard.addCity("Tokyo");
    } catch (error) {
        console.log("Note: Using demo mode (API key needed for real data)");
    }

    // Get detailed report
    await dashboard.getDetailedWeatherReport("Cairo");

    // Change units
    dashboard.changeUnit("imperial");

    // Export data
    dashboard.exportData();
}

// Run the demo
demonstrateWeatherDashboard();
Remember This
"APIs are the bridges that connect different worlds of data. Master async programming, and you'll be able to build applications that interact with the entire internet!" 🌐
Task (Essential Practice)
Create a Movie Search App that includes:
- API Integration with a movie database
- Async/await for handling requests
- Error handling for failed requests
- Modern JavaScript features (destructuring, arrow functions)
- Local storage for favorite movies
// Starter code - complete this program
class MovieApp {
    constructor() {
        this.apiKey = "your-omdb-api-key"; // Get from http://www.omdbapi.com/
        this.baseUrl = "https://www.omdbapi.com/";
        this.favorites = JSON.parse(localStorage.getItem('favoriteMovies')) || [];
    }

    // TODO: Complete these methods
    async searchMovies(query) {
        // Search for movies using the OMDB API
        // Handle errors appropriately
        // Return array of movie objects
    }

    async getMovieDetails(imdbId) {
        // Get detailed information about a specific movie
        // Use destructuring to extract needed properties
        // Return formatted movie object
    }

    addToFavorites(movie) {
        // Add movie to favorites array
        // Save to localStorage
        // Avoid duplicates
    }

    removeFromFavorites(imdbId) {
        // Remove movie from favorites
        // Update localStorage
    }

    displaySearchResults(movies) {
        // Display search results in a user-friendly format
        // Show title, year, poster, and type
    }

    displayFavorites() {
        // Show all favorite movies
        // Include option to remove from favorites
    }

    getMovieRecommendations() {
        // Based on favorite movies, suggest similar ones
        // Use genre or director information
    }
}

// TODO: Create instance and test the functionality
let movieApp = new MovieApp();

// Example usage:
// await movieApp.searchMovies("Inception");
// await movieApp.getMovieDetails("tt1375666");
// movieApp.displayFavorites();
Requirements:
- Use async/await for all API calls
- Implement proper error handling with try/catch
- Use destructuring for API response data
- Use arrow functions and modern JavaScript syntax
- Store favorite movies in localStorage
- Handle cases where API returns no results
- Display user-friendly error messages
Bonus Features:
- Add movie ratings and reviews functionality
- Implement search filters (year, genre, type)
- Add pagination for search results
- Create a watchlist separate from favorites